
*** Updated April 5 2013 ***
Major changes:
04/05/2013 - Remote control section update, mention about CEC
03/16/2013 - New advancedsettings.xml version
03/05/2013 - overclocking correction
02/11/2013 - Advancedsettings.xml corrections
01/18/2013 - Major review: Download location, SSH activation, Themes locations...
12/03/2012 - Rpi 512MB update / Recommended Build
13/11/2012 - Overclock corruption workarounds, Last build test, note about missing videos when used as client of main XBMC
23/10/2012 - Image builds location changed / Add link to upgrade script as alternative
10/15/2012 - Recommended "stable" build
11/09/2012 - Update Backup & Restore
10/09/2012 - Update issue amendment
09/29/2012 - Add Verified Wireless section
09/28/2012 - Add a conservative mode in case of constant corruption
09/26/2012 - Turbo Mode data corruption workaround
09/24/2012 - New Turbo mode
09/21/2012 - Add memorandum section
09/21/2012 - Fit to screen correction and turbo mode announcement
09/20/2012 - Fit to screen section
09/19/2012 - Add backup / restore section
09/18/2012 - Add upgrade section - Add recommended themes
09/16/2012 - First version
The Goal:
Get a fully functional XBMC Media Center on Raspberry Pi !
The Raspberry Pi is a very cheap and interesting small computer created by the Raspberry foundation for educational purposes.
Therefore, it comes with a GPU able to decode HD Video, a great community works on this device and allow us today to use it as a real XBMC Media Center.
Major sources:
To help you setting up Openlec on your Raspberry Pi, don't hesitate to take a look at following pages:
My others XBMC related posts and guides:
http://youresuchageek.blogspot.fr/search/label/XBMC
OpenELEC Raspberry Pi FAQ:
http://openelec.tv/forum/124-raspberry-pi/40979-raspberry-pi-faq
OpenELEC WIKI for Raspberry Pi:
http://wiki.openelec.tv/index.php?title=Building_and_Installing_OpenELEC_for_Raspberry_Pi
OpenELEC Forum for Raspberry Pi: If you have any issue, this is the place to go!
http://openelec.tv/forum/124-raspberry-pi
Official XBMC Website and Forum:
http://xbmc.org/
http://forum.xbmc.org/
eLinux.org full description of available advanced values for Raspberry Pi:
Interesting posts for Raspberry Pi:
Summary of steps:
Step 1: Install OpenELEC on your SDCard
Step 2: Boot your Raspberry Pi and first setup
Step 3: Activate SSH (default is off)Step 4: Connect to your Raspberry Pi and setup config.txt
Step 5: Configure your advancedsettings.xml
Step 6: Sound Setup
Step 7: Set up XBMC and your Media Library
Step 8: Customize Skin
Step 9: Remote Control
Step 10: Optional - Verified Wireless Interfaces
Step 11: How to update OpenELEC
Step 12: How to backup and restore
Conclusion
Memorandum
FAQ & issues
Let's start !
Step 1: Install OpenELEC on your SDCard
First thing, if you don't already have one, i would recommend you to get a "Class 10" SDHC Card, XBMC will be much more powerful on such cards.
Off course, this will still works on any SDHC Class SD card.
Download Last OpenELEC Build for Raspberry Pi:
Edit 01/18/2013: Previous download locations are outdated, to get the very last Rpi OE version, please use the download link in main OpenELEC Website: (look for Raspberry Pi)
http://openelec.tv/get-openelec/
********************************************** OUTDATED **********************************************
Edit 12/03/2012: Recommended build: http://sources.openelec.tv/tmp/image/OpenELEC-RPi.arm-devel-20121124031454-r12577.tar.bz2
Note: This build is compatible with both 256MB and 512MB Raspberry, take a look here:
http://forum.xbmc.org/showthread.php?tid=140518&pid=1246709#pid1246709
Note for 512MB Raspberry:
If you have a 512MB Raspberry with a previous OpenELEC version installed, you should restart with a fresh install. (or move your current config.txt to config.txt.old before upgrade)
The required gpu mem option will automatically be set depending on your Raspberry Pi hardware.
You could choose to compile yourself OpenELEC for your Raspberry Pi, therefore i advise you to download last OpenELEC build on:
- Archive Builds: http://sources.openelec.tv/tmp/image/archive/
- Last build (file name: "http://sources.openelec.tv/tmp/image/OpenELEC-RPi.arm-devel-*.tar.bz2"): http://sources.openelec.tv/tmp/image/
These images are provided in Bz2 tar archive, when downloaded just extract it using your Desktop (right click then extract here) or in command line:
http://openelec.tv/get-openelec/$ tar -xjf OpenELEC-RPi.arm-devel-*.tar.bz2
Note: For Windows users, you may need an Archive Software such as 7zip to extract this archive
You will get a new directory "OpenELEC-RPi.arm-*", just go in this extracted directory to begin the creation of your SD-card.
If you are using Linux:
Real easy, just insert your Flash card into your card reader.
Your Flash card should identified as "/dev/sdb" (/dev/sda being your first drive), ensure this is the case (in case of you have more than one drive connected) using "mount" command.
Then, Go into the new directory and just execute:
$ sudo ./create_sdcard /dev/sdb
If your are using Windows:
Go to:
http://www.squirrelhosting.co.uk/hosting-blog/hosting-blog-info.php?id=9
Step 2: Boot your Raspberry Pi and first setup
Insert your Flash card and boot your Raspberry.
OpenELEC will boot within a few minutes and XBMC will open.
Set screen:
With no additional configuration, you may have some "fit to screen" issues, in XBMC UI and play back also.
If you have some issues, proceed as follows:
Depending on your TV/Screen and configuration, you may try 2 methods, one manipulating overscan values and one other with UI zoom tuning.
Method 1: Set overscan - RECOMMENDED
Note a reboot is required.
Also "overscan_scale" is an experimental set, test with and without.
Try to set in your config.txt overscan settings (see Memorandum to learn how to update config.txt):
Note: Adapt overscan position values to your TV/screen
# Make display smaller to stop text spilling off the screen
overscan_scale=1 # http://www.raspberrypi.org/phpBB3/viewtopic.php?f=67&t=15700
disable_overscan=1
overscan_left=57
overscan_right=59
overscan_top=20
overscan_bottom=20
This worked perfectly for me.
Depending on your TV/Screen you can also just try: (did not worked for me)
You can also just try to disable overscan:
disable_overscan=1
Also test some overscan values (above) and check your TV config (set full mode...)
Method 2: Set UI Zoom
This method also worked for me, therefore the first method should be preferred to avoid issue when playing back.
An easy way to resolve your fit to screen issue could be to customize UI zoom (by probably -6 or -8%).
To do so, do as follows:


When done, do not hesitate to calibrate your screen:


Step 3: Activate SSH (default is off)
SSH is now off by default and can be activated using the OpenELEC OS addon, under the section "Services".
To access to the OpenELEC OS Addon:
- Main menu "Programs" / Sub-menu "OpenELEC OS"
- Mai menu "Parameters" then Programs
Choose to activate the SSH daemon under the section Services, and reboot.
Step 4: Connect to your Raspberry Pi and setup config.txt
In XBMC, Go to "parameters", then scroll down and go to "System Information".
Finally go to the Network panel to know your device IP Address:


Now that you know your IP Address, connect to your Raspberry;
Default password is: openelec
If you are on Linux:
Open a Terminal and go into SSH:
$ ssh root@XXX.XXX.XXX.XXX
If you are on Windows:
Download putty (freeware) and connect with SSH to your host
Setup your config.txt:
Edit 01/18/2013: config.txt coming with new builds now contain all required information to correctly set your main settings like Overcloking values, still information above are correct
*****************************************************************************************************************************************************************
DISCLAIMER ABOUT OVERCLOCKING:
Overclocking is not officially supported by OpenELEC, if you do so this is at your own decision and own risk.
Overclocking feature may result in file system corruption, data losses, crashed or global instability.
OpenELEC developers won't give any warranty about those risks until a fix is officially supported.
Therefore, Overclocking on Raspberry Pi will not break your guarantee if you use the new Turbo Mode which is described bellow. (only setting overvoltage without dynamic frequency allocation would break your Raspberry's warranty)
Overclocking is still under work in OpenELEC and Raspberry Pi in general, this is an experimental feature and you should be prepared to restore your installation in case of trouble. (see section How to backup and restore)
*****************************************************************************************************************************************************************
Note: See Memorandum section for a full config.txt sample
Default CPU frequency of Raspberry Pi is 700Mhz, you can check it as follows:
cat /proc/cpuinfo
You should see something like "BogoMIPS : 697.95" which confirms this frequency.
Do as follows:
mount -o remount,rw /flash
vi /flash/config.txt
OVERCLOCKING:
*********************************************************************************
Edit 09/23/2012: The Raspberry foundation introduced recently a new overclocking mode which sets on demand frequencies, you can now overclock your Raspberry Pi without breaking the guarantee.
Ensure to have the very last OpenELEC build!
Data Corruption:
Many people have data corruption and instability with higher overclocking modes, this seems to be related to high values of overvoltage.
For example, i have myself the case with a 8GB Class 4 that gets instantly corrupted when any overclock mode is set, where the same manufacturer Class 10 never got corrupted, still this is not related with class type SD card.
Anyway, you when your setup is done, see backup and restore section, this way if you have data corruption you could easily restore your flash card without re-installing.
Workaround : Set initial_turbo in config.txt
Edit 09/28/2012: If you have file system corruption with your settings, try to set:
initial_turbo=30
See: http://openelec.tv/forum/124-raspberry-pi/47056-turbo-mode?limit=20&start=20It will force turbo mode after boot for the time set (max 60 secs) and should help preventing data corruption.
If even with this setting you still have Data corruption, try to comment "overvoltage=2" in Medium mode.
And if finally this still fails to work without file system corruption, i advise you to go back a more conservative overclocking mode which will work in most casse:
Conservative Overclocking mode:
arm_freq=850
gpu_freq=325
sdram_freq=425
If after all, you can't get any stable situation with overclocking mode enable, then simply disable it :-)
OpenElec works also very fine in default mode, moreover you should remember that higher CPU/GPU/Ram frequency does not change anything in playback quality ^^
*********************************************************************************
Then go in insert mode (press key "i") and set your overclock settings.
Based on my tests, i would recommend this settings, but you can change, test or prefer what ever you want.
I could not get stability on higher overclocking model than Medium.
Be sure not to set "turbo_force=1" (or to set it to "0") because it would deactivate dynamic frequency. (and break your guarantee)
See Memorandum at the end of this post to see other overclocking modes and how to check activity.
force_turbo=0
#Medium
arm_freq=900
core_freq=333
sdram_freq=450
over_voltage=2
# Force HDMI
hdmi_force_hotplug=1
Then save your file (press ":wq!") and:
mount -o remount,ro /flash
reboot
After reboot, you can see in kernel messages (run command "dmesg") CPU frequency dynamic allocation depending on your config:
bcm2835-cpufreq: switching to governor ondemand
bcm2835-cpufreq: Freq 700000->900000 (min=700000 max=900000 target=900000 request=900000)
bcm2835-cpufreq: Freq 900000->700000 (min=700000 max=900000 target=700000 request=700000)
Using the following command will also return current CPU frequency:
vcgencmd measure_clock arm
MPGE2 and VC1 Support:
If you want MPEG2 and VC1 Support, the Raspberry foundation now allows us to buy 2 cheap licences that will activate this.
So simply go to Raspberry's site:
http://www.raspberrypi.com/
You will need your CPU serial number, which you can easily get using the command:
cat /proc/cpuinfo
Or if you prefer, Go in XBMC, Parameters > Scroll down > System information and you will find you CPU serial number.
Look for the value next to "Serial" and Enter it into the Raspberry's site.
You will receive your licence keys within a few hours or days, when done add your keys to your config.txt as follows:
# MPEG 2 Hardware acceleration
decode_MPG2=XXXXXXXXXX

# VC1 Hardware acceleration
decode_WVC1=XXXXXXXXXX
Step 5: Configure your advancedsettings.xml
Now you need to configure your advancedsettings.xml file for XBMC, using this file you will ask XBMC to apply some tunes to improve UI performances:
- Deactivating RSS feeds that consumes CPU
- Activating Dirty Region
- Tuning Thumbnails and Fanart resolution
- Tuning Network memory buffer (note: not really proved this changes anything!)
I advise you to access to the share called "Userdata" using your File Browser and navigating to your Network and OpenELEC host.

Then, use any text editor (example Gedit for Linux and Notepad for Windows) and create a new file called "advancedsettings.xml" with the following content:
Updated March 16, 2013: New advancedsettings.xml version
Note: This is new version of the advancedsettings.xml adapted to ARM processor like the RPi, if you have any issue with thumbnails quality due to the older file version, please delete your folder "~/.xbmc/userdata/Thumbnails", ensure you have the following advancedsetings.xml file and reboot
The option "useddsfanart" must be set to false, explanation (thanks to Anonymous commentary):
"This settings allows XBMC to use your GPU rendering fanart and some other images. This will make loading images considerably faster, especially on systems with slower processors (e.g. Intel Atom based systems). Do not use this option on ARM based systems (Apple TV2/iOS/RPi/many Android systems) as it is likely to degrade performance because DDS images are not supported."
<advancedsettings>
   <fanartres>540</fanartres>
   <imageres>512</imageres>
   <useddsfanart>false</useddsfanart>
   <lookandfeel>
 <enablerssfeeds>false</enablerssfeeds>
   </lookandfeel>
   <bginfoloadermaxthreads>2</bginfoloadermaxthreads>
</advancedsettings>
Old version:
<advancedsettings>
   <fanartheight>540</fanartheight>
   <thumbsize>512</thumbsize>
   <lookandfeel>
 <enablerssfeeds>false</enablerssfeeds>
   </lookandfeel>
   <bginfoloadermaxthreads>2</bginfoloadermaxthreads>
</advancedsettings>
When done, finally reboot!
Step 6: Sound Setup
In XBMC, setting the sound will be enough easy.
There is 2 possibilities, or you want a sound output through HDMI, or you will use your analogical connection through the jack connection provided.
In XBMC, go to parameters > sound configuration and set HDMI or analogical.
Also, if your TV does not take this in charge (or the sound system connected to your TV), ensure to unset sounds protocols.
Finally, please note that OpenELEC on Raspberry Pi does not uses ALSA for the sound ouput but OpenMixer (OMX), so don't try for now to use as far an example an external USB soundcard if you need an Optical connection, that won't be possible as for now...
Also, it will be much better to have a sound system able to decode DDS and so on, if you don't the CPU/GPU will have to downmix the sound, which causes more usage.
Some file could be hard to play for this reason.
Note: Without any DDS hardware support, you may issues with some MKV files, this is causes by software sound conversion using CPU required when your sound system does not support it.
Step 7: Setup XBMC and your Media Library
Now that your XBMC installation is ready to use, you need to configure your Media Library, and some few settings depending on your taste. (skins...)
I recommend you to take a look at other guides i wrote for XBMC, you will find fully applicable ways to manage your Library.
http://youresuchageek.blogspot.fr/2012/06/xbmc-install-and-config-howto-for-linux.html
Go to Step 9
The Raspberry Pi is a very small device, if you are used to htpc don't expect to get the same kind of performances while scanning your Media Library, this will take a long long time ^^
I would recommend to use it as client of an other main XBMC installation that will take care about managing the Media Library and sharing it through SMB or NFS with an automatically shared Database. (Mysql)
Note about Mysql sharing: By the past i had some issues (missing videos) because of my XBMC master and slave version were using different versions of Mysql db (internal XBMC versions).
Ensure you always have most up to date possible XBMC versions when sharing over Mysql to avoid these kind of issue.
Consider your sharing Method:
If you are sharing your Media Files through your Network (from a NAS or share by another computer), you will probably wonder about the best way to set the Media Player.
Take a look at my post to configure Media Library sharing between your XBMC instances:
http://youresuchageek.blogspot.fr/2012/09/howto-xbmc-share-and-sync-your-media.html
Files shared from a Windows computer (even Windows Server) should be shared and accessed by XBMC using SMB protocol.
Files shared from an Unix / Linux Operating system should have better performances when accessed by NFS.
Therefore, in my configuration with all tests i've made, i noticed instability with NFS sharing mode, while SMB share were very stable, even shared from a Linux based system.
So, i would recommend SMB sharing in our configuration.
You don't have to mount your Network shares in your Raspberry Pi to act as a client, just browse when you add a Video source to the protocol of your choice, XBMC will care about that.
Step 8: Customize skin
By default XBMC is provided with Confluent skin.
In my opinion, in our configuration the UI works good enough to keep it.
Therefore, i would recommend to deactivate Fanart back screen to get better performances:

Edit 01/18/2013: With last OpenELEC builds, number of older themes are not available anymore under the main XBMC repository because they're not yet fully compatible with Frodo.
Still some of theme now have dedicated Frodo version, like the Quartz theme i recommend for your Rpi.
You can download it here:
https://github.com/pecinko/quartz
Download the theme as a Zip file, then proceed to manual installation under XBMC extension manager inside Parameters.
Here are some themes known to work good on Raspberry Pi, my preference goes to "Quartz" which real fast and good looking:
- Quartz
- Rapier
- SLIK
- Xperience1080
Some Quarz screenshots on Raspberry Pi:


Step 9: Remote Control
CEC - Consumer Electronic Control
Controlling XBMC using a remote control is in my opinion something primordial for any nice media center solution.
If you are lucky, you have a quite recent TV which is CEC compatible :-)
Note: CEC stands for Consumer Electronics Control, a protocol built into HDMI that allows for one appliance to control another)
Then the good news, The Raspberry hardware in addition with libcec included in OpenELEC is fully CEC compatible :-)
You simply have nothing to do! Just plug and boot, very impressive.
Your remote control will work out of the box, i've tested it several time and it works very very good!
Generic MCE Remote control
If you're less (lucky), then i recommend you to get a cheap MCE Remote that will work out of the box in OpenELEC and XBMC.
I've tested and validated to work out of the box on OpenELEC for Raspberry:
600-hfx-vista

Philipps RC197
http://cgi.ebay.fr/Mando-HTPC-Media-Center-MCE-Multimedia-Philips-RC197-Receptor-Remote-Control-/271056452988?pt=LH_DefaultDomain_186&hash=item3f1c393d7c#ht_2183wt_1434
Validated to work out of the box by others:
MCE r6 1039

Many others should also work!
Step 10: Optional - Verified Wireless Dongle
Wireless Interfaces known to work out of the box under OpenELEC:
Here are some verified Wireless interfaces that works out of the Box in OpenELEC, many others way work but haven't been tested by myself or by people comments confirmation.
- Leguang LG-N18 150Mbps IEEE802.11 b/g/n USB 2.0 Wi-Fi Wireless Network Adapter
- Silver Crest IEEE802.11 b/g/n USB 2.0 Wifi Dongle (rtl8192 chipset)
- TP-Link TL-WN821N V2.0 300mbps IEEE802.11 b/g/n USB 2.0 Wifi Dongle
Feel free to add comments on this posts for any verified Wireless dongle under OE.
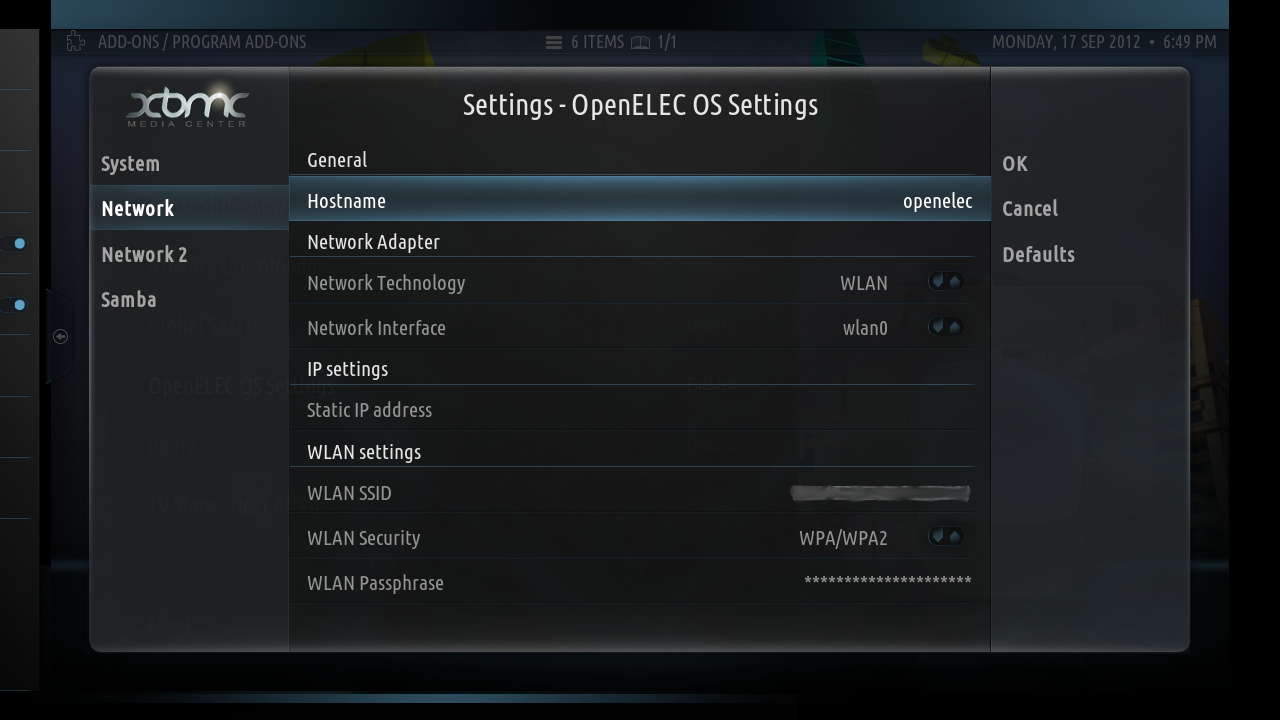
Wireless Configuration:
To configure your Wireless interface, nothing more simple:
- Plug you Wireless interface
- Check your interfaces status (ifconfig), if you Wireless interface works out of the box you should get a new interface normally called "wlan0"
- Go to OpenELEC OS Settings addon (Parameters > Addons > Enabled Addons > Program)
You have to know:
- Your Wireless SSID (eg the name of your Wireless Network)
- Your Wireless Encryption mode, WEB or WPA
- Your encryption Key
Step 11: Upgrade OpenELEC
As for now, the automatic update process through OpenELEC Addon does not seem to work for Raspberry. (as far as i have seen)
Still you can update manually, which is easy enough anyway and the recommended way.
Edit 09/20/2012: With last OpenELEC builds, this is not required anymore to manually upgrade the bootloader by copying files from "3rdparty/bootloader" to "/flash"
Edit 10/09/2012: Thanks to xbs who gave the right answer, temporarily deactivating overcloking avoids update issues using the standard method
How to update:
*****************************************************************************************************************************************************************
IMPORTANT - Issue while overclocking mode enabled
If you have any overclocking mode enabled, i recommend for now to temporarily deactivate overclocking while applying upgrade, if you don't you have many chances to break your system.
To do so:
- Rename /flash/config.txt to anything you want (eg. mv /flash/config.txt /flash/config.txt.off) - The goal is to deactivate Overclocking while we are updating
- Apply update as follow (copying SYSTEM* and KERNEL* to upgrade, reboot)
- When update is done (you have rebooted), rename config.txt to normal name to reactivate Overcloking
- Reboot (to apply)
You're done :-)
*****************************************************************************************************************************************************************
Edit 10/23/2012: You may be interested with the following script that allows to achieve update in terminal within an SSH sessions. (pay attention to overclock issues when upgraded as in the manual way)
See:
https://github.com/xsteadfastx/rpi-openelec-upgrade
1. Download last version in your computer (See Step1 to get the proper URL)
2. Extract files
3. Connect to your Raspberry SMB share "Update" and copy files located in the directory "target" you previously extracted:
- KERNEL and KERNEL.md5
- SYSTEM and SYSTEM.md5
4. Finally reboot, the update process will automatically occur
Step 12: How to backup and restore
Your should consider about backing up your installation, the only element really required to be backed up is the main xbmc directory which contains all of your data.
I personally recommend the method using Partclone or dd. (Partclone will be faster but has some requirements)
Partclone will require that partitions you want to restore from previously backed up have exactly the same size.
Using the well known tool "dd", there is no requirements to restore but the operation requires more time as dd also considers blank spaces as data.
Using tar to backup the main xbmc folder will also works but you may have to recreate your flash card (if you system is broken) and cover the system itself.
Method 1: Using "partclone"
You can also use this alternatively method with Linux and Partclone:
Install Partclone:
$ sudo apt-get install partclone
How to backup:
Insert your card into your computer and do as follows:
$ sudo umount /dev/sdb1 && sudo umount /dev/sdb2
$ sudo fsck -yf /dev/sdb2
$ sudo partclone.fat -c -d -s /dev/sdb1 -o raspi_openelec_sdb1_mm_dd_yyyy.img
$ sudo partclone.ext4 -c -d -s /dev/sdb2 -o raspi_openelec_sdb2_mm_dd_yyyy.img
How to restore:
Insert your card into your computer and do as follows:
$ sudo umount /dev/sdb1 && sudo umount /dev/sdb2
$ sudo partclone.fat -r -d -s raspi_openelec_sdb1_mm_dd_yyyy.img -o /dev/sdb1
$ sudo partclone.ext4 -r -d -s raspi_openelec_sdb2_mm_dd_yyyy.img -o /dev/sdb2
Method 2: Using "dd"
You can also use this alternatively method with Linux and Partclone:
How to backup:
Insert your card into your computer and do as follows (ensure your flash card is seen as sdb!)
$ sudo dd if=/dev/sdb of=raspi_openelec_mm_dd_yyyy.img bs=1M
How to restore:
Insert your card into your computer and do as follows (ensure your flash card is seen as sdb!):
$ sudo dd if=raspi_openelec_mm_dd_yyyy.img of=/dev/sdb bs=1M
Using dd will restore any partition without any other requirements.
Method 3 : Simple method using tar
How to backup:
Boot your Raspberry Pi and create a Tar archive of your XBMC folder:
# cd /storage
# tar -cvzpf /storage/xbmc_raspi_backup_mm_dd_yyyy.tar.gz .xbmc
How to restore:
To restore, simply re-create your flash SD-Card using Openelec.
Then boot your Raspberry Pi, use a SCP client to connect (WinSCP for Windows, native SSH /desktop integration / GFTP for Linux) and copy your previously backed up Archive directly in root Home Folder.
Then restore (adapt DIRECTORY to the folder where resides your tar.gz file)
# cd /storage
# tar -xvzpf DIRECTORY/xbmc_raspi_backup_mm_dd_yyyy.tar.gz
Conclusion:
As for now, XBMC with OpenELEC works very great for such a small device that could seem really low powerful.
I noticed a real low CPU usage using specified customization, providing you a smoothly XBMC Interface.
CPU Usage:
For information, with last OpenELEC build, i can observe a very low CPU Usage when IDLE, around 15-20 % not more.
Note: You should see very different CPU usage values in XBMC System Information Panel, this is caused by screen rendering. See Post #12 on http://openelec.tv/forum/124-raspberry-pi/44834-speed-comparison-with-xbian)
My Raspberry is connected trough the local Network and access to an XBMC Shared Library (Using SMB and Mysql), to be honest almost all videos 720p/1080p plays with no issues.
Therefore, Huge HD Video files will probably be difficult or impossible to play, you should avoid having files with a size bigger than 13-14 Gb... (when playing over your Network)
As a conclusion, i have to say that i am positively surprised by this small animal capacity, even if i would not change my main HTPC for a Raspberry Pi, this is very interesting and it makes a real good second XBMC client :-)
OpenELEC guys have done a real good job for this device, thank you!
Feel free to comment!
Memorandum:
- How to update config.txt to set your Raspberry Pi parameters:
mount -o remount,rw /flash
vi /flash/config.txt
- Official 5 Overclocking settings with New Turbo mode:
Don't set "force_turbo" to value "1", let the default value (0)
None
force_turbo=0
arm_freq=700
core_freq=250
sdram_freq=400
over_voltage=0
Modest
force_turbo=0
arm_freq=800
core_freq=300
sdram_freq=400
over_voltage=0
Medium
force_turbo=0
arm_freq=900
core_freq=333
sdram_freq=450
over_voltage=2
High
force_turbo=0
arm_freq=950
core_freq=450
sdram_freq=450
over_voltage=6
Turbo
turbo_mode=0
arm_freq=1000
core_freq=500
sdram_freq=500
over_voltage=6
How to check:
Check your kernel messages using the command "dmesg", you will see such messages which confirms the Turbo mode:
bcm2835-cpufreq: switching to governor ondemand
bcm2835-cpufreq: Freq 1000000->700000 (min=700000 max=1000000 target=700000 request=700000)
bcm2835-cpufreq: Freq 700000->1000000 (min=700000 max=1000000 target=1000000 request=1000000)
- Monitor CPU frequency, temperature and others
Using the following command will return current CPU frequency:
vcgencmd measure_clock arm
If you want, add this script to your storage:
sysinfo.sh
#!/bin/bash

echo -e "\n###############################################"
echo "#       RASPBERRY PI SYSTEM INFORMATIONS      #"
echo "###############################################"

echo -e "\nCPU current Frequency: `vcgencmd measure_clock arm`"
echo "CORE current Frequency: `vcgencmd measure_clock core`"
echo "CORE current Voltage: `vcgencmd measure_volts core`"
echo "CPU current Temperature: `vcgencmd measure_temp`"

echo -e "\nFirmware Version: `vcgencmd version`\n"

echo -e "Codecs Status:"
echo "`vcgencmd codec_enabled H264`"
echo "`vcgencmd codec_enabled MPG2`"
echo "`vcgencmd codec_enabled WVC1`"

echo
And add this script to your "~.profile" if you want it when you log in with SSH, or add an alias to call this script, or whatever you want :-)
- A sample current config.txt:
# config.txt - In OpenELEC edit this file as follows:

#################################################
# mount -o remount,rw /flash                    #
# then edit and save your modification using vi #
# sync                                          #
# mount -o remount,ro /flash && reboot          #
#################################################

####################
# VARIOUS SETTINGS #
####################

# Force HDMI even if unplugged or powered off
hdmi_force_hotplug=1

#####################
# OVERSCAN SETTINGS #
#####################

# Make display smaller to stop text spilling off the screen
overscan_scale=1 # http://www.raspberrypi.org/phpBB3/viewtopic.php?f=67&t=15700
disable_overscan=1
# Adapt overscan values to your needs
overscan_left=57
overscan_right=59
overscan_top=20
overscan_bottom=20

############
# LICENCES #
############

# Licences for MPEG2 and VC1
decode_MPG2=xxxxxxxxxx
decode_WVC1=xxxxxxxxxx

###########################################################
# OVERCLOCKING MODE - REQUIRES TURBO MODE (recent builds) #
#                                                         #
# Uncomment one of the section you want to use            #
# After reboot use command "vcgencmd measure_clock arm"   #
# to get current CPU frequency                            #
##########################################################

# If you have any data corruption using Turbo Mode and overclocking
# to with this setting uncommented

#initial_turbo=30

# If this still fails, try to use Medium mode whitout "over_voltage=2"
# If this finally still fails, forget about this until this gets fixed
# Use a more conservative mode that will works fine in any cases:

# Conservative (unofficial mode)
#arm_freq=850
#gpu_freq=325
#sdram_freq=425

# Official Raspbian Overclocking modes:

# None
#force_turbo=0
#arm_freq=700
#core_freq=250
#sdram_freq=400
#over_voltage=0

# Modest
#force_turbo=0
#arm_freq=800
#core_freq=300
#sdram_freq=400
#over_voltage=0

# Medium
arm_freq=900
core_freq=333
sdram_freq=450
over_voltage=2

# High
#arm_freq=950
#core_freq=450
#sdram_freq=450
#over_voltage=6

# Turbo
#arm_freq=1000
#core_freq=500
#sdram_freq=500
#over_voltage=6
FAQ & Issues:
- Resolution and fit to screen issues:
If you still have issues with resolution, i've seen in this post an interesting config.txt setting, adapt to your needs:
http://openelec.tv/forum/124-raspberry-pi/38818-raspberry-pi-feedback?limit=20&start=160#44907
# Set stdv mode to PAL (as used in Europe)
sdtv_mode=2

# defines the aspect ratio for composite output (3 = 16:9)
sdtv_aspect=3

# Force the monitor to HDMI mode so that sound will be sent over HDMI cable
hdmi_drive=2

# Set monitor mode to DMT
hdmi_group=1

# Set monitor resolution to 1080p 50Hz
hdmi_mode=31

# Pretends HDMI hotplug signal is asserted so it appears a HDMI display is attached
hdmi_force_hotplug=1

# Make display smaller to stop text spilling off the screen
overscan_scale=1 # http://www.raspberrypi.org/phpBB3/viewtopic.php?f=67&t=15700
disable_overscan=1
overscan_left=57
overscan_right=59
overscan_top=37
overscan_bottom=37
- Fail to play back ISO of DVD and DVD files:
This depends on many factors (the way you created your iso files and so on), still playing back with success ISO of DVD including Menu and DVD files is not absolutely guarantee.
You could think about converting into MKV files which will play perfectly!
Thanks for putting this together, it helped me with screen resolution issues I was having.
ReplyDeleteand btw, to upgrade I only need to go to step 3, steps 4 & 5 were not necessary, obviously 6 was
You're welcome ^^
DeleteSteps 4 and 5 (upgrading bootloader) is in deed not an obligation but more a precaution, if next Openelec release for Raspi updates it, you won't know it and if you don't update, your Raspberry Pi won't able to boot
Youresuchageek: Howto Raspberry Pi : Openelec On Raspberry Pi, Get A Great Xbmc Experience On Your Raspberry Pi >>>>> Download Now
Delete>>>>> Download Full
Youresuchageek: Howto Raspberry Pi : Openelec On Raspberry Pi, Get A Great Xbmc Experience On Your Raspberry Pi >>>>> Download LINK
>>>>> Download Now
Youresuchageek: Howto Raspberry Pi : Openelec On Raspberry Pi, Get A Great Xbmc Experience On Your Raspberry Pi >>>>> Download Full
>>>>> Download LINK uK
With the zoom setting to get full screen - I have set disable_overscan=1, and then on my TV, set the picture mode to "full". I used to set the zoom, but then video gets clipped, as the resolution (see /proc/cmdline) is no longer 1080p/720p etc.
ReplyDeleteHaven't noticed that with my TV abut already saw that on ATI based HTPC...
DeleteI've integrated your remark, thks
Oh, and latest OpenELEC also updates the bootloader automatically
ReplyDeleteCould you be more precised, how do you achieve your OE update ?
DeleteJust drop kernel/system + md5 into update share, then reboot! You'll see a message saying the bootloader was updated.
DeleteKeep up the good work
Thanks :-)
DeleteAnd ssh was enabled by default on the builds i've been using for the last few months...
ReplyDeleteintegrated thanks!
DeleteThanks your comments, things are done to be improved.
ReplyDeleteWill check and integer.
MCE r6 1039 works out of the box.
ReplyDeletehttp://www.mythtv.org/wiki/File:MCE-Remote-2.jpg
Ok, will be added tks
DeleteAmazing Tutorial.
ReplyDeleteThanks a lot.
Regards from Spain
Glad you like, thanks :-)
DeleteLeguang LG-N18 150Mbps IEEE802.11 b/g/n USB 2.0 Wi-Fi Wireless Network Adapter works out of the box :)
ReplyDelete@xbs: I will add a verified Wireless interfaces section :-)
DeleteNice article, found a lot of good information here.
ReplyDeleteThanks for your work!
You're welcome, glad you enjoy!
DeleteThanks for your tutorial, It's great.
ReplyDeleteWhere can I download Quartz skin ?
Thanks :-)
DeleteQuartz is available in official XBMC addons repository, so just go to parameters > appearance > theme and click "More", you'll see Quartz available.
Note:
- Don't use a media view with fanarts behind to get better performances possible
- Since some night builds, i noticed an high CPU usage using Quartz theme but only in home screen (even when doing nothing) but when you go in any other screen (like movies) CPU usage goes back to normal
Bonjour,
DeleteLorsque je cherche à changer de thème,je ne trouve que backrow, hybrid et transparency (qui est affiché comme inexploitable). Je ne vois donc pas comment passer à Quartz.
Existe-t-il un autre moyen de l'installer?
Merci
Bonjour,
DeleteOui ce n'est pas soucis vous pouvez l'installer manuellement par un fichier zip (dans l'écran addons) cf:
Thread du forum XBMC pour ce skin:
http://forum.xbmc.org/showthread.php?tid=101319
Et pour télécharger le zip:
https://github.com/pecinko/quartz
@+
Merci beaucoup pour l'info et pour toutes les autres infos contenues dans ce tuto rès complet.
DeleteA+
Avec plaisir,merci ^^
DeleteMost complete instructions out there ... Thanks
ReplyDeleteGlad you like thanks ^^
DeleteHow do you know if you have data corruption from overclocking?
ReplyDeleteIf you have Data corruption, your system won't be able to boot and you'll get an error at OpenELEC screen boot time (something like impossible to mount flash)
DeleteWhen your system is up (first boot after you enabled overclocking if you are in the case where you have data corruption) you will also see a lot of error in kernel messages (using the command "dmesg")
If you get and error while updating using the .update method insert the card on a PC and copy the files manually: system, kernel and bootloader files. Before you copy change the kernel name to kernel.img.
ReplyDeleteI have used the .update method with success but I need to mount /flash as rw remove/rename the config.txt and apply the .update (reboot). After that I simply mount /flash again as rw and copy/rename the config.txt.
It seams that the OC in the config.txt is causing the problem with the .update method. Hope it helps.
Cheers!
@xbs:
DeleteHi, thanks for the update, i've tested and confirm that overcloking result in breaking the standard upgrade method, thanks to you i would recommend to temporarily rename /flash/config.txt, then reboot, copy upgrade, reboot to apply, rename config.txt and final reboot :-)
Thanks!
Hi Guilhem,
DeleteAny special reason why you recommend 'rename - reboot | update - reboot | rename - reboot'?
I usualy 'rename/update - reboot | rename reboot'.
No problems so far.
Thank you for such a nice guide!
Hi xbs,
DeleteWell no, just by precaution :-) But obviously you 're right and the first reboot is not really required ^^
Thanks!
Cheers
Interesting post by dom regarding card corruption and a possible fix
ReplyDeletehttp://www.raspberrypi.org/phpBB3/viewtopic.php?f=29&t=6201&start=625
@xbs: Thanks, seems interesting ^^
Deletejust got back my second Rpi i used for testing purposes, i have a 4GB transcend class 4 and always had instantly data corruption.
DeleteSo gonna run into some tests ^^
Nice tutorial, found a lot of good information here.
ReplyDeleteThanks ^^ Don't hesitate if you see any correction or improvement required
DeleteHi, thanks, will check that :-)
ReplyDeleteThank you for a very thorough guide. Maybe you can answer a couple of questions that arise for me:
ReplyDelete1. I am thinking of using my Pi as always-on XBMC media server using a USB-harddisk and mySQL. It seems you are not recommending this, is that due to possible lack of stability or lack of power?
2. Does it make a big (or at least noticeable) difference whether you use class 6 og class 10 SD-drive?
3. On windows my XBMC-appdata folder is about 8,9 GB. I would probably install fewer addons on the Pi, but still it would require at least 8 and possibly 16 GB on the SD-card. Or am I wrong?
You're welcome ^^^
Delete1. For sure you can use your Rpi as a main XBMC, therefore you just have to keep in mind that is a small device and scanning for media requires time...
Note that the only real interest of using Mysql is to share automatically your Media Library with other XBMC instances, so if this is the only instance there is no real interest.
About USB disk attached, as far as you have an enough powered USB Hub you should not have any issue or stability problem
I personally prefer to use my Rpi as a client of main XBMC, but this is my opinion and this off course requires an other device to act as the server...
2. You will always get better performances with Class 10, but the difference with Class 6 could not be really noticeable, if you have the possibility choose a Class 10
3. Your XBMC userdata folder size will grow with time and configuration, addons but also thumbnails, fanarts, extra-fanarts, etc...
Therefore 9 GB seems very big, even with a large media Library it should less, if you look in details each sub folder size you will know what's you required size.
8GB card should be enough.
If you are planing to use your Rpi as the main XBMC, you should seriously back up your partitions from time to time, upgrades or tweaks can easily break your system, and this may very boring to restart from scratch when all your Media Library se set in the Rpi ^^^
I advise you to use partclone with a linux based computer, backing up and restoring your partitions will be very easy... (See http://youresuchageek.blogspot.fr/2012/07/mini-linux-how-to-clone-your-active.html)
Quick answer! Merci beaucoup :-)
Delete1. If it's always on, scanning time shouldn't be a problem after the initial setup? And since I don't have a NAS, but would like to have my media always accessible from multiple clients, I will be trying out the Mysql-solution with the power saving Pi. I assume that a powered USB won't be necessary, when the USB disk is powered by itself?
2. I will go for Class 10 (Sandisk - after reading http://www.raspberrypi.org/phpBB3/viewtopic.php?f=63&t=16639)
3. You are right that the userdata folder is much smaller than 9 GB, but wouldn't I have to also count the size of the parent directory (appdata/XBMC) and all its other subfolders?
Being new to linux I don't understand much of your partclone tutorial. But if I did follow the guide (and ask enough noob questions on the way), would it enable me to instantly power on a reserve machine running linux to take over the server obligations of the failing Pi? Or will I "just" be able to restore the partition on the Pi as I guess be the case by following the shorter (1 line: dd if=/dev/sdx of=/path/to/image bs=1M) solution in this post http://raspberrypi.stackexchange.com/questions/311/how-do-i-backup-my-raspberry-pi?
Je t'en prie :-)
Delete1. You are right, if the external USB disk is powered itself you should have any problem.
And if you have some, then think about testing with a powered USB Hub.
For scanning and sharing from the Rpi, for sure you can.
Keep in mind that your client should use same major flavor of XBMC (Frodo)
See:
http://youresuchageek.blogspot.fr/2012/09/howto-xbmc-share-and-sync-your-media.html
3. Yes you do, but as i said before that will depends of your utilization, the folder expected to consume spaces will be userdata (Thumbnails / Database) with a fresh install.
in your case with an utilization as the main XBMC instance, 16Gb could be better
For backup / restore, in my opinion the simplest way is the good way, from time to time (before upgrades as for an example) poweroff the Rpi, plug your flash and run a backup (i would recommend using partclone, this will be much more faster, see my Step 12 in this post)
Restoring would be very easy as all system storage is on a simple flash using partclone or even dd.
I do this all the time. (put your backup commands in a small shellscript, and restore in an other to simply your life)
1. your system is just broken (i mean partitions are still present in the flash card), just restore as described in the post
2. your system is broken and there is
I have been using Linux for over 5 years and had a small problem transferring the image to SD under Ubuntu. I was referencing the SD as /dev/mmcblk0p1 instead of /dev/mmcblk0 (root device not the partition. Had me going for a while. Doh! Damn good walk-through though. Better than a lot I have seen. Keep up the great work.
ReplyDeleteThanks ^^
DeleteGreat instructions, especially post install. I just switched permanently to OpenELEC after flipping back and forth between that and Raspbmc and looks like the missing piece I was looking for is here in advancedsettings.xml Merci beaucoup!
ReplyDeleteThanks a lot ! I'm very glad it helped you, don't hesitate if you see any interessting improvement ^^
DeleteAs people say here, "Avec plaisir" ^^
Tested it out last night and it's all good. Noticeable difference and aesthetically, it's great not to have the RSS feed anymore. I'm officially sticking with OpenELEC. Merci encore! (de Montreal)
DeleteCool ^^
DeleteCheers from Toulouse!
Bonjour bonjour !
ReplyDeleteAlors déjà, un grand merci pour ce post/tutoriel qui est rempli d'informations très utiles (si seulement j'avais vu ça à mes débuts avec le RPI...^^).
J'ai pu mieux comprendre le fonctionnement de certains éléments et faire certaines optimisations :
- L'affichage de la conso CPU qui m'inquiétait un peu (toujours à 90% mini même en idle). Mais avec un bon vieux `top` , me voilà bien rassuré ^^. (pourquoi ne pas y avoir pensé avant ...)
- J'ai fait un OC en Médium et le résultat est bluffant pour ma part :
--> Ensemble de l'UI bien plus fluide
--> Lecture nickel de mes 1080p avec son DTS sans buffering toutes les 2 sec (downmix) :)
J'aurai par contre deux questions :
- Où pourrais je trouver les différentes options possibles pour le advancedsetting.xml ?
- Y a t-il des changelog quelque part sur le web pour les builds de OpenELEC pour RPI ?
J'ai cherché un peu partout pour ces 2 interrogations mais sans succès.
Merci encore pour ce tutoriel et bonne continuation :)
Bonjour!
DeleteMerci, avec grand plaisir :-)
Pour répondre à vos questions:
- Pour toutes les options du fichier advancedsettings.xml, je vous conseille le lien suivant issue du wiki officiel XBMC, tout y est normalement :
http://wiki.xbmc.org/index.php?title=Advancedsettings.xml
- A ma connaissance pas de changelog spécifique de OpenElec pour Rpi, les changes sont ceux d'OE et/ou de XBMC (je me souviens avoir vu une question sur le sujet sur le forum OE)
Le meilleur endroit pour ce genre de chose est le forum d'OE dédié au Rpi:
http://wiki.openelec.tv/index.php?title=Building_and_Installing_OpenELEC_for_Raspberry_Pi
Les développeurs d'OE y sont entre autre présents donc :-)
Bonne continuation également !
Merci pour ces informations supplémentaires :)
DeleteI believe that the initial_turbo will force turbo mode after boot for the time set (max 60 secs) and not wait that time to kick turbo mode in.
ReplyDeleteHi, you're right, corrected :-)
DeleteHi,
ReplyDeleter12457 has two issues, confirmed by others on the xbmc.org forum:
1. Remote key 'ok/select' doesn't change AR.
2. Remote key 'info' doesn't do what is supposed to.
Great news for 512Mb owners
ReplyDeletehttp://forum.xbmc.org/showthread.php?tid=140518&pid=1246709#pid1246709
Thanks for this news, will be integrated
DeleteShould I see Openelec as an entry inside Windows 7 Network folder? //OpenElec opens the webinterface.
ReplyDeleteYes you should, if you use back slash ;-) in the Windows file manager you can access to smb shares using \\ipaddress (openelec which is the smb hostname by default Should also work)
DeleteMy pleasure ;-)
ReplyDeleteHi, I follow your steps to overclock and reboot.
ReplyDeleteAfter reboot it still says Bogomips 697, yet the config.txt keeps my updated settings.
Any idea why?
Hi,
DeleteYes, this is normal, this value won't be updated in turbo mode which is a dynamic CPU frequency allocation mode. (but in overclocked using non turbo mode this will be changed)
Use this command (see at the end of my guide for a full script)
vcgencmd measure_clock arm
This will give the current CPU freq which will change depending on CPU load
Regards,
Hmm, I started a mkv playing then went to my pc and did: vcgencmd measure_clock arm
DeleteIt said frequency(45)=700000000
Checked dmesg and at bottom it says:
bcm2835-cpufreq: switching to governor ondemand
bcm2835-cpufreq: switching to governor ondemand
config.txt still says:
force_turbo=0
arm_freq=850
core_freq=400
sdram_freq=425
over_voltage=0
Should I try another distro?
Dan,
DeleteNo, you should not :-)
Ok, first playing a mkv won't require CPU load as it's using GPU (and not CPU) hardware decoding.
So this is normal.
Then, check your CPU frequency various times (not only one) when you are doing things that requires CPU load, such as navigating inside XBMC menu.
or do it at boot time
Deleteand last i would suggest using medium mode:
Delete# Medium
arm_freq=900
core_freq=333
sdram_freq=450
over_voltage=2
Works great for me.
But you can try various settings, up to you.
Ahhh, did it during boot time and it was at 850, dropped back down to 700 after boot.
DeleteThanks, nice guide too!
ssh doesn't work in the Openelec build you suggest for the 512MB RPi (r12577). I am using Putty from Windows and always get 'connection refused'. (It worked fine for a later release, but the USB keyboard/mouse wasn't working - another known bug - so I reverted to your recommended build).
ReplyDeleteThe ssh refusal issue is also documented elsewhere (http://openelec.tv/forum/69-network/54126-ssh-server-refuses-connection-devel-builds-post-r12176). I have enabled ssh with the blank 'ssh_enable' file.
Can you suggest another openelec build for 512MB RPi - where USB input AND ssh works? ;-)
Hi, i don't have yet a 512 MB Rpi myself, will check last builds and revert :-)
DeleteI also get 'connection refused' even after creation a black file named 'ssh_enable' in de Configfiles dir.
ReplyDeleteI found the solution also :)
DeleteOf source add an empty to 'ssh_enable' in de Configfiles directory which is explained above. But also delete via root the .ssh (hidden folder) in the storage partition of openelec and create a new .ssh folder: mkdir .ssh.
Eventually also remove all the files in the folder .cache/ssh in the storage partition (note: .cache is again a hidden folder). It will not auto generate new files for you. You can easily enable hidden files in Ubuntu via ctrl+h in Nautilus or go to View -> Show hidden files.
It will now auto generate* -,-
DeleteGreat! Thanks ^^
DeleteTested out working for Wireless Dongle
ReplyDeleteTP-Link TL-WN821N V2.0 300mbps IEEE802.11 b/g/n USB 2.0 Wifi Dongle
Thanks, will be reported!
DeleteI've installed from scratch on my very new RPi the latest build r12577. I'm really surprised about the well working XBMC. But a lot of Addons are marked as 'Broken' and are not working. Has anybody experiences with that?
ReplyDeleteHi, yes i've seen that too, i will take a look at this, you may also ask to the main OpenELEC Rpi thread:
Deletehttp://openelec.tv/forum/124-raspberry-pi
Hi,
DeleteI have reviewed my guide an ran into some tests and verification, the download location indicated in the OpenELEC wiki for Raspberry Pi is outdated and does not contain anymore the very last build.
Check the main OpenELEC download page and follow the Rpi link.
If you still have a lot a plugin marked as broken, i would advise to re-install completely from scratch your OE.
Last build seems to work very well :-)
This is one of the best sources for XBMC newbies running OpenELEC.
ReplyDeleteGreat Instructions.
My setup.
I have 4xRPi`s, 3 Rooms running XBMC v12 RC3 OpenELEC 3.0 (RC 1) - 2.99.1 (of course) all hardwired. Each have 16GB Class 10
4th RPi is used as my DB server running MySql on Raspbian OS to sync all my clients.
My main XBMC installation is on a laptop,OS=Win7, for updating my media library.
2x2TB NAS's, 1 for SD movies/music and other for HD movies only.
NAS's, laptop, DB server, main RPi(on big screen) all connected via 1Gbit switch.
Other rooms I use AT&T U verse boxes which are connected via coax to each room.
Turns out that you can connect to the network by plugin into the back of them via the Ethernet port on the back of each box. Plus they have a USB port that powers my RPi's.
To optimize XBMC I have turned off
- Downloading Actors Thumbnails
- Extract Thumbnails and Video Information
- Replace file names with library titles
I use Media Companion to scrape my movies before updating my library.
All RPi's are on 24/7.
Once all my artwork, fanart, posters, etc are cached on each RPi they perform remarkably fast and the only thing they really pull from the central DB server are the .nfo files for plot/actor info.
nuff said....
Hi, thanks :-)
DeleteWhat a great geek installation !!! If you have anything to correct don't hesitate :-)
In your guide you add the algorithmdirtyregions and the nofliptimeouts in the advancedsettings.xml
ReplyDeleteThis is not necessary because both options are the default settings as of XBMC Frodo.
http://wiki.xbmc.org/index.php?title=Dirty_regions
Hi Rob,
DeleteThanks for the information, i will update.
Cheers
I have a Philipps RC197. How I can make it work? Please help me >.<
ReplyDeleteNote: TpLink WN725N tested, works perfect out of the box
Hi,
DeleteStrange it does not, it should work out of the box... Is your receiver plugged directly to your Rpi or through a USB Hub ?
I noticed in my case that when plugged in the HUB, the receiver wasn't working, therefore no issue when directly plugged to the Pi USB port
Directly to the Pi USB port. Very strange :S, just plug, turn on the Pi and work? Do I need to change something in openelec settings?
DeleteMaybe low power? 5V and 700mA
Yes, plug and play ^^
DeleteIn deed it could be a low power issue, 700mA is the very minimal power output, at least 1000mA would be better...
I try with my 5V 2000mA Nexus 7 power supply. wont work >.<
DeleteMy raspberry is 256MB model. maybe openelec version? raspberry firmware? :S
Yes you should try a totally fresh install i guess!
DeleteIs the receiver powered by the Pi ? (if it has a power LED witness) not any message when you plug/unplug it ? (using 'dmesg' command)
Also perhaps activating logs in XBMC and/or checking xorg logs could help (in /var/log)
Ok, i will try a new install
DeleteYes the receiver is powered by the usb Pi. When I push remote buttons 1 red led blinks in the receiver but doesnt work. 'dmesg' on putty SSH?
My remote and his receiver http://www.electrola.dk/images/RC197.jpg
Thanks for your help :)
I have the same on my Pi's, works perfectly out of the box!
DeleteYes when you plug / unplug, check in command line (using putty if you're under Windows) kernel messages using the command "dmesg" and look for something related to your receiver.
But definitvely you should begin with a totally fresh install with no custom settings at all, let XBMC start and check if it hopefully works...(it should)
Good luck ^^
This comment has been removed by the author.
DeleteYess, it works, thank you Guilhem :)
DeleteOne thing more, i bought VC1 and MPEG codecs. justo need SSH with putty, login and write
mount -o remount,rw /flash
vi /flash/config.txt
(its correct remount,rw ??
and delete # from here no?
# Licences for MPEG2 and VC1
# decode_MPG2=xxxxxxxxxx
# decode_WVC1=xxxxxxxxxx
Hi David,
DeleteGreat to hear you finally made it work ^^
Yes that's correct, a "#" means a line considered as a commentary.
So delete "#" in front of the 2 lines and insert your decode numbers, a reboot is required.
If you want to check that this has been activated with success, enter these commands through ssh:
vcgencmd codec_enabled MPG2
vcgencmd codec_enabled WVC1
Regards
Bonjour,
DeleteJ'ai un soucis avec mes jaquettes, elles sont bcp trop compressées.
J'utilise le plugin xbmc mais sur le raspberry avec openelec, les jaquettes sont degueu.
C'est bizarre, elles sont bien 30s et semblent recompressées dans la foulée
Tu aurais une idée ?
Merci
Bonjour,
DeleteVersion récente d'openelec ? (dernière version 2.99.2)
J'ai déjà vu çà mais des versions assez anciennes...
J'aurais tendance à conseiller une réinstall complète et rescan complet de la bibliothèque. (s'assurer de purger tous les fanarts, poster.jpg, etc... dans les répertoires des fichiers vidéos si ils ne sont pas centralisés dans la config)
Oui, la derniere ... compilé le 02/02.
ReplyDeleteJ'ai trouvé une solution en rajoutant 512 dans mon advancedsettings apres avoir fait le menage complet en supprimant Textures13.db et les thumbnails.
512
ReplyDeletePardon.
Ah zut, ca n'apparait pas. Il faut mettre imageres 512 imageres
ReplyDeleteGreat article. Thanks for all the info. However, after doing this I kept encountering a lot of crashes. I was using openelec. After a lot of debugging, I finally pinpointed the issue to the setting
ReplyDelete30242880
in the advancedsetting.xml.
The documentation says that XBMC will use 3 times the amount specified above which amounts to about 90MB. I was running the old raspberry pi with 256mb RAM out of which 128MB is allocated to GPU, so the 90MB was actually pushing the pi out of memory and kernal was killing XBMC which caused the crashes. Finally fixed it by removing that setting.. hope that helps someone running into this issue.
Hi, Thank you very much, and many thanks for reporting it!
DeleteI updated this section and suppressed this setting ^^
Regards,
Guilhem
Merci beaucoup Guilhem, une super config qui aide à tirer parti du maximum de son Pi! Tout marche nickel sur le modèle 256Mio.
ReplyDeleteAvec plaisir, heureux de l'entendre! :-)
DeleteHi there! Great article. I have a question though. I attached NTFS formatted USB disk to pi and it gets mounted in XBMC as read only. Any ideas on how to change this to read/write? Thank you.
ReplyDeleteHi, thanks ^^
DeleteOpenELEC comes with ntfs 3g implemented, so it should able to get write access over NTFS drive.
What makes you think your drive is mounted read-only ? Have you tried a simple file creation using the CLI (connected to ssh, try a "touch myfile" under your drive)
I would not recommend you to use NTFS within your Rpi, the pi is a very small powerful computer and performances with NTFS could be poor enough, if don't specifically have reason to use NTFS (if you use the same drive with other Windows computers as for an example) you should really prefer ext4 as file system, performances will be much much betters
I've tried to create/delete file/folders from file manager in xbmc, with ssh into pi, over samba... With no luck. Tried chmod 777 it returns Read only filesystem error. One disk has two partitions, fat32 and NTFS, and I can do whatever I want on fat32, but nothing on NTFS.
DeleteI've tried everything with my lomited knowledge of linux, therefore I'll take your advice to format it to ext4.
Indeed the file system seems to be mounted read only, one explanation could also be the requirement to run a check and repair operation under Windows (using chkdsk command or under the computer explorer and propriety)
DeleteIf the NTFS file system has been incorrectly unmounted (hard reset, cold reboot) or contains file system errors, this could lead Linux to fail correctly mounting it. (still this is a possibility, nothing sure)
Hi, i just tested an NTFS volume under OE with a Rpi, no problem with write access.
DeleteI think your issue was related with errors on your file system or the file system not having been closed correctly
Guilhem
hey, and thanks for ur very nice guid. but im asking me how to set "sync" in fstab, where ist the fstab on opnelec?
ReplyDeleteHi, thanks ^^
DeleteIn deed this remark was more related to Raspbian than OpenELEC itself (as OS running Raspberry they share the same potential issue related to file system corruption)
OpenELEC does not really support any fstab as a standard Linux OS, you would have to access OpenELEC fs and recompile it yourself (needs to be checked, never tried it myself)... no real interest i think, i will remove this :-)
Merci Guilhem pour ce super tutoriel!
ReplyDeleteQuestion en passant: as-tu essayé avec du contenu ayant une bande son DTS ou AC3 sans avoir un décodeur externe? Je compte acquérir un RPi pour l'utiliser comme client XBMC sur la télévision dans la chambre à coucher et je n'ai pas d'amplificateur pour faire du passthrough. Je vais donc devoir décoder le DTS et l'AC3 sur le RPi avant de l'envoyer au téléviseur. Est-ce que c'est pensable?
Merci beaucoup!
Bonjour Louis,
DeleteMerci avec plaisir :-) Oui normalement pas de soucis, il faut juste désactiver dans la config son les mode décodeur compatibles DTS et AC3.
Egalement, je te conseille d'activer un mode d'overcloking assez elevé pour que le décodage fonctionne correctement ^^
Guilhem
Bonsoir,
ReplyDeleteUn grand merci pour ce tutoriel très détaillé!(la preuve j'y suis arrivé!) ;)
Cependant j'ai le même problème que DoMiNiOn, mes jaquettes sont vraiment affreuses...
J'ai tenté les explications de DoMiNion, mais ça ne marche toujours pas chez moi..
Voici mon advancedsettings:
540
512
false
2
Est ce que j'ai oublié quelque chose?
Merci beaucoup!
Julien
hum... Je comprend mieux certain commentaire =p
ReplyDeleteMon advancedsettings est un copier/coller de celui que tu nous propose.
DoMiNiOn à écris "imageres 512 imageres" je peux le placer n'importe ou dans le advancedsettings?
Merci beaucoup!
Julien
Bonjour Julien,
DeleteAvec plaisir :-)
J'ai mis à jour la section concernant le fichier advancedsettings.xml avec une nouvelle version, remplace ton fichier actuel par celui-ci et purge le répertoire Thumbnails (~/.xbmc/userdata/Thumbnails).
Après un reboot, les jaquettes seront de bien meilleures qualités ^^
Let me know !
@+
Bonsoir,
ReplyDeleteMerci beaucoup! c'est nettement de meilleure qualité! ;)
Par contre je sais pas si c'est normal mais elle reste quand même de piètre qualité par rapport à celle que j'ai sur mon PC dans XBMC...
Merci pour le thème Quartz il est vraiment plus fluide que confluence c'est un régal =)
Et merci pour ta réactivité Guilhem! ;)
Julien
De nada avec plaisir :-)
DeleteOui c'est vrai qu'elles sont de moins bonnes qualités, après je pense qu'il est certainement possible de jouer sur ces paramètres pour améliorer la qualité, voir de les supprimer mais cela au risque d'affecter les performances lors la navigation... à tester!
A bientôt
Guilhem
Recently tested TP-Link TL-WN722N 150mbps IEEE802.11 b/g/n USB 2.0 WiFi adapter. Works out of the box.
ReplyDeleteHi
ReplyDeleteI'm the happy owner of a Pi. I've installed OpenELEC, without any fuzz. It's connected to my network and I can install and update additional programs from the Internet. Unfortunantly I cant access it via SSH. It's activated in the menu (System -> OpenELEC -> Services) and has been restarted many times, but I can't access it. I can see the IP in the Pi (System -> Systeminfo), but I can't even ping it.
What have I done wrong?
Hi,
DeleteYour issue seems more related to a networking issue than anything related to the Pi or OpenELEC
As long as you can't ping it (which will always be the better first test to achieve), no chance to connect to any service running on your Pi, like SSH.
Are you sure to be in the same local network ? Any firewall or security software running in your computer that could prevent outgoing networking requests ? Could you try from different computers connect in the same network ?
Thanks for your reply.
DeleteIt could seem that it was related to my network, but I can't figure out what it should be.
- Same subnet
- Pi does have connection to the internet.
- All other network devices work, as expected (labtops, tablets, TV, APTV, XBOX, etc).
- All DHCP
- I can connect to my Cisco ASA firewall with SSH from the same PC, but not the Pi.
- Portscaning my subnet doesn't work as well.
I'm not sure if the SSH-service is really activated or not. Could be nice with a shell.
Great tutorial, thanks for your work.
ReplyDeleteI've got openelec installed on 2 Pi in 2 different rooms, using a nas for storage and to host the mysql shared database.
Everything works flawlessly. I only noticed one minor glitch; one of the Pi uses an asus usb-n10 wifi dongle to connect to the LAN. The dongle works out of the box, but when the system boots, xbmc cannot access the nfs shares on the nas. I have to restart xbmc from ssh (just xbmc, not the whole system) and then everything is working fine. Looks like xbmc launches before the wifi connection is enabled. Have you experienced any similar problems?
Thanks again.
Hi, thanks!
DeleteNot really, but i don't have the same kind of installation, all of my Pi's are wired connected.
I've tested some Pi's using wireless, but with local storage.
When you boot and XBMC is unable to access to your NFS shares, is your Pi connected to your Wifi ? (as for an example, can you ping it from another computer, or connect to your Pi using SSH)
It would confirm or not your connection reliability at XBMC boot.
Also and if your Pi is connected at boot, you could check using SMB instead of NFS (at least for testing purposes)
Last remark, ensure your installation is very clean (no upgrades from previous version), i would re-start from scratch using a new install, just to test
Let me know
Cheers!
One more thing, if at boot time your Pi is connected as it should but still you can't get access to NFS shares until you restart XBMC, a workaround could to locally mount your NFS shares in your Pi using a sleep to ensure the system waits enough for the connection to be established.
DeleteSee as for an example:
http://www.openelec.tv/forum/124-raspberry-pi/62439-solved-nfs-over-wireless-buffering
A simple script as supplied in this thread would do the trick:
#!/bin/sh
(sleep 30; \
mount -t nfs 192.168.1.102:/share/public/xbmc.meta /storage/wz-nas.public -o nolock,rw,rsize=8192,wsize=8192,intr,hard; \
)&
If it works (and answered to your needs), then simply access to your media like any local storage
Hi, thanks for your reply.
ReplyDeleteWhen xbmc starts, it cannot access the nfs shares. But if I use the built-in file manager, I can access the smb shares on the nas without restarting (can't remember right now if I can access the nfs shares too).
The wifi dongle has a led that shows network activity, which becomes active (blinking) only after xbmc has started. That's why I'm, pointing my finger at a delay in the wifi network connection. So your suggestion to try with a sleep script is definitely worth a try.
I am aware that using wifi to access the storage is probably not a very good solution, but I don't have any other way to get network connection to my kitchen, and watching my tv series while washing dishes is something I've got used to :-P
Thanks for your suggestions, I will let you know if your script will do the trick.
Kodi Tips has a list of best Kodi addons for 2020.
ReplyDeleteSimilarly, I found best kodi builds article on vpnhacks.com.
ReplyDeleteHOMEPAGE2
ReplyDeleteHOMEPAGE2
HOMEPAGE2
HOMEPAGE4
HOMEPAGE2
Youresuchageek: Howto Raspberry Pi : Openelec On Raspberry Pi, Get A Great Xbmc Experience On Your Raspberry Pi >>>>> Download Now
ReplyDelete>>>>> Download Full
Youresuchageek: Howto Raspberry Pi : Openelec On Raspberry Pi, Get A Great Xbmc Experience On Your Raspberry Pi >>>>> Download LINK
>>>>> Download Now
Youresuchageek: Howto Raspberry Pi : Openelec On Raspberry Pi, Get A Great Xbmc Experience On Your Raspberry Pi >>>>> Download Full
>>>>> Download LINK
elazığ
ReplyDeleteerzincan
bayburt
tunceli
sakarya
KGİN23
görüntülü show
ReplyDeleteücretlishow
BQALV
Tokat Lojistik
ReplyDeleteKonya Lojistik
Mersin Lojistik
Karabük Lojistik
Samsun Lojistik
6SCMİH
Kocaeli Lojistik
ReplyDeleteUşak Lojistik
Osmaniye Lojistik
Çorlu Lojistik
Kocaeli Lojistik
TR1B21
uşak evden eve nakliyat
ReplyDeletebalıkesir evden eve nakliyat
tokat evden eve nakliyat
kayseri evden eve nakliyat
denizli evden eve nakliyat
106VST
van evden eve nakliyat
ReplyDeletesivas evden eve nakliyat
çankırı evden eve nakliyat
bartın evden eve nakliyat
erzincan evden eve nakliyat
TVEY
trabzon evden eve nakliyat
ReplyDeletebursa evden eve nakliyat
ordu evden eve nakliyat
erzurum evden eve nakliyat
mardin evden eve nakliyat
LVA
şırnak evden eve nakliyat
ReplyDeleteçankırı evden eve nakliyat
nevşehir evden eve nakliyat
antalya evden eve nakliyat
artvin evden eve nakliyat
6FWRZ
FCC1C
ReplyDeleteAntep Lojistik
Denizli Şehir İçi Nakliyat
Okex Güvenilir mi
Zonguldak Parça Eşya Taşıma
Isparta Lojistik
Ünye Oto Boya
Mersin Şehir İçi Nakliyat
Kırıkkale Şehirler Arası Nakliyat
Çerkezköy Cam Balkon
1ADE0
ReplyDeleteBartın Lojistik
Çanakkale Şehir İçi Nakliyat
Pursaklar Fayans Ustası
Nevşehir Lojistik
Karaman Şehir İçi Nakliyat
Artvin Parça Eşya Taşıma
Afyon Şehirler Arası Nakliyat
Eryaman Boya Ustası
Kütahya Lojistik
D7193
ReplyDeletehttps://steroidsbuy.net/steroids/
Edirne Parça Eşya Taşıma
Düzce Lojistik
Aksaray Evden Eve Nakliyat
AAX Güvenilir mi
order clenbuterol
Sinop Şehirler Arası Nakliyat
Karapürçek Boya Ustası
Kütahya Lojistik
27DD8
ReplyDeletebinance komisyon indirimi %20
02B6C
ReplyDeleteResimli Magnet
DDC32
ReplyDeletetelefonda kadınlarla sohbet
osmaniye canlı sohbet et
eskişehir telefonda rastgele sohbet
bitlis ücretsiz sohbet
mersin mobil sohbet
kilis sesli sohbet mobil
en iyi ücretsiz sohbet siteleri
muğla canlı sohbet bedava
canli sohbet
AC4F3
ReplyDeleteApenft Coin Hangi Borsada
Bitcoin Yatırımı Nasıl Yapılır
Linkedin Takipçi Hilesi
Snapchat Takipçi Hilesi
Görüntülü Sohbet
Twitter Beğeni Hilesi
Soundcloud Beğeni Satın Al
Parasız Görüntülü Sohbet
Bitcoin Madenciliği Siteleri
6727D
ReplyDeleteraydium
looksrare
safepal
zkswap
trust wallet
dextools
defillama
poocoin
onekey
I like how well-organized and clear this post is. Check out the advice in this article Spacebar Clicker Game. It's a fast-paced, agile exam that's frequently played competitively.
ReplyDelete