
*** Updated February 3, 2013 ***
Major changes:
02/03/2013 - Upgrade to OpenELEC 3.0 ^^
10/17/2012 - Upgrade to first Stable 2.0 !!!
10/14/2012 - Upgrade to Release Candidate 2 (RC2)
10/07/2012 - Upgrade to Release Candidate 1 (RC1)
10/03/2012 - UMA Frame Buffer Size recommendation updated
10/02/2012 - Various corrections
09/25/2012 - Initial Version
Edit 10/17/2012:
I strongly recommend using OpenELEC 3.0 for Fusion systems, it's very stable and cool ^^
See: http://openelec.tv/get-openelec/viewcategory/4-fusion-builds
Zotac Zbox are well known Home Media Center PC, small, complete and powerful.
In this post, i will expose a recent model based on AMD Fusion system and called "Zotac NANO XS AD11", associated with Openelec.
Openelec is very good Linux based distribution for XBMC, it's very light, almost all is working out of the box and easy to install and configure.
This box is very very small, incredibly small and has a good factory product, first let's some pictures of the animal ^^


And to give you an idea of its size, let's compare it to a well know product! (Iphone 4)

As you can see, it is very, very small :-)
The Zotac AD11 is provided with a Zotac MCE Remote control, an internal IR receiver and also an external USB IR receiver.
The remote control is perfectly working out of the box under Openelec, no intervention required.
Also, this device is provided with a USB Wireless interface, again working out of the box ^^
Thanks to the great work of Openelec developers, Openelec will easily give us an XBMC installation working out of the box, and able to deal with any HD movie!
Let's start!
Summary of steps:
Step 1: Configure UMA frame buffer size in UEFI
Step 2: Install OpenELEC
Step 2.1: Standard installation using media installator
Step 2.2: Manual alternative installation method (example in dual boot with an other system)
Step 3: Configure OpenELEC (Network, Video Options, Skin)
Step 4: Configure your Media Library
Step 5: Configure the sound
Step 6: Zotac MCE Remote control
Step 7: Optional - Opera addon - Integrated Web Browser
Conclusion
Memorandum
FAQ
Step 1: Configure UMA frame buffer size in UEFI
First of all, we need to set a very important setting in Zotac EFI, if you don't you will get playback issue impossible to resolve in OpenELEC!
See:
http://openelec.tv/forum/117-xvba-amd/45194-solved-zotac-ad11-playback-problems
So, to set this:
- Power on the Zotac and access to UEFI by pressing SUPPR key at boot time
- Go in screen "Chipset"
- Set UMA at 1G (default is 256M, see Note above for more details)


Save and reset.
Note: If you have enough Memory (let's beginning with 2GB), then setting UMA at 1GB is recommended to avoid any playback issue.
Still you can try with 512MB and update to 1GB in case of trouble.
See Peter's comments. (thanks to him!)
Step 2: Install Openelec
Step 2.1: Standard installation with media installator
Use this method if you don't plan to have multiboot on same device, with an other Linux installation as for example.
If you plan to have multiboot, go to "Step 2.2: Manual alternative method (Multiboot)
Installing Openelec is very easy and will be done a few steps.
Don't hesitate to take a look at the main Wiki Openelec Website:
http://wiki.openelec.tv/index.php?title=Main_Page
Installation will be done in a few simple steps, described as bellow:
- Download Openelec installator and extract
- Create your installation booting USB Key
- Boot with your USB Key and install Openelec
1. Download and extract Openelec
Go to:
http://openelec.tv/get-openelec
Look for the section "FUSION Builds' and download the last version, i recommend you to use the last version even if still considered as Beta.
Note: You have to choose between PVR version and non PVR version, if you want to know the difference, PVR means Personal Video Recorder and is used to access to Live TV systems.
Even if you don't have any PVR, choosing the version with PVR won't change anything, so don't worry too much.
Openelec is provided as a Bz2 compressed Tar archive, on Linux desktop environments, you can easily extract here with a right click / Extract Here, or use the command line in Terminal:
$ tar -xjf OpenELEC_PVR-Fusion*.tar.bz2
2. Create your USB installation key
For Linux Users:
Insert your USB Key and go to the extracted Directory, identify your device name. (you can use the "mount" command to do it, usually your USB key should /dev/sdb)
Then execute the provided script:
$ sudo ./create_installstick /dev/sdb
See the following Wiki page if you need more help:
http://wiki.openelec.tv/index.php?title=Installing_OpenELEC_on_HTPCs_with_LINUX_(Part_1)
http://wiki.openelec.tv/index.php?title=Installing_OpenELEC_on_HTPCs_with_LINUX_(Part_1)
For Windows Users:
Inset your USB Key and launch "create_installstick.exe".
See:
http://wiki.openelec.tv/index.php?title=Installing_OpenELEC_on_HTPCs_via_Windows_(Part_1)
For Mac OS X Users:
See:
http://wiki.openelec.tv/index.php?title=Installing_OpenELEC_on_HTPC%27s_with_Mac_OS_X_(Part_1)
3. Boot with USB Key and install Openelec in your internal device
Real simple, just boot with your USB Key connected. (if it fails then your first boot device may not be the USB key, enter the UEFI and force boot to the USB Key)
If you need help, see:
http://wiki.openelec.tv/index.php?title=Installing_OpenELEC_on_HTPC%27s_Part_2_for_all_OS
SSH: I recommend to activate SSH when asked by installator
Note: You can also manually install OpenELEC if you plan to use it in Multiboot with other OS.
I won't cover it here.
Step 2.2: Manual alternative installation method (Multiboot)
1. Install your system(s) and set your partitioning
Use this installation method if you plan to have Multiboot.
I recommend you to install first systems you are planning to use on same device, let enough space free on your internal Volume for 2 OpenELEC partitions. (which can be logical partitions and not primary)
Partitioning example with an other Linux Installation (adapt to your needs or preferences):
Internal Volume is called "/dev/sda":
- /dev/sda1: Main root ("/") partition for system 1
- /dev/sda2: Logical main partition
- /dev/sda5: Home ("/home") parttion for system 1
- /dev/sda6: Swap partition for system 1
- /dev/sda7: System partition for OpenELEC
- /dev/sda8: Data partition for OpenELEC
When installation your first system, ensure to let enough space for your OpenELEC installation, the system partition does not requires much spaces. (256MB or 512MB will be largely enough)
Requirement for Data partition depends on you, if you have enough space set something like 8GB.
I recommend to use "gparted" when your are running your first system to create required partitions for OpenELEC.
Create 2 ext4 partitions with labels (labels are required, don't miss it) "OE_SYSTEM" and "OE_DATA".
Mount the OE_SYSTEM partition in your active Linux.
2. Extract OpenELEC and set your boot loader
- Download from OpenELEC site the last version and extract it. (using your desktop or the command "tar -xvjf <openelec archive" in command line)
- Copy files contained in "target" directory to the OE_SYSTEM partition you have previously mounted
- Edit the grub customize file and add your section for OpenELEC:
Adapt to your set up, in my example case:
/etc/grub.d/40_custom
menuentry "OpenELEC" {
    set root=(hd0,7)
    linux /KERNEL boot=/dev/sda7 disk=/dev/sda8 quiet
}
And update grub:
$ sudo update-grub
Note:
To easily manager your Grub boot loader (changing order and so on), i advise you to install grub-customizer:
sudo add-apt-repository ppa:danielrichter2007/grub-customizer && sudo apt-get update && sudo apt-get install -y grub-customizer
Your OpenELEC installation is ready to be started, just reboot and choose OpenELEC at boot time. (which you should choose as default)
Step 3: Configure OpenELEC and customize XBMC
If you have Confluent theme, Go to Parameters, scroll down and select sub menu "OpenELEC":

With other themes, you have can go to "Addon" or Parameters > Addon, then you may have to scroll up upon "Program Addon" then "OpenELEC OS Settings":


Set up your language
To configure your language, Go to Parameters > Appearence:

You may also need to configure your keyboard layout, Go to OpenELEC OS Settings, you have to reboot for this to be applied:

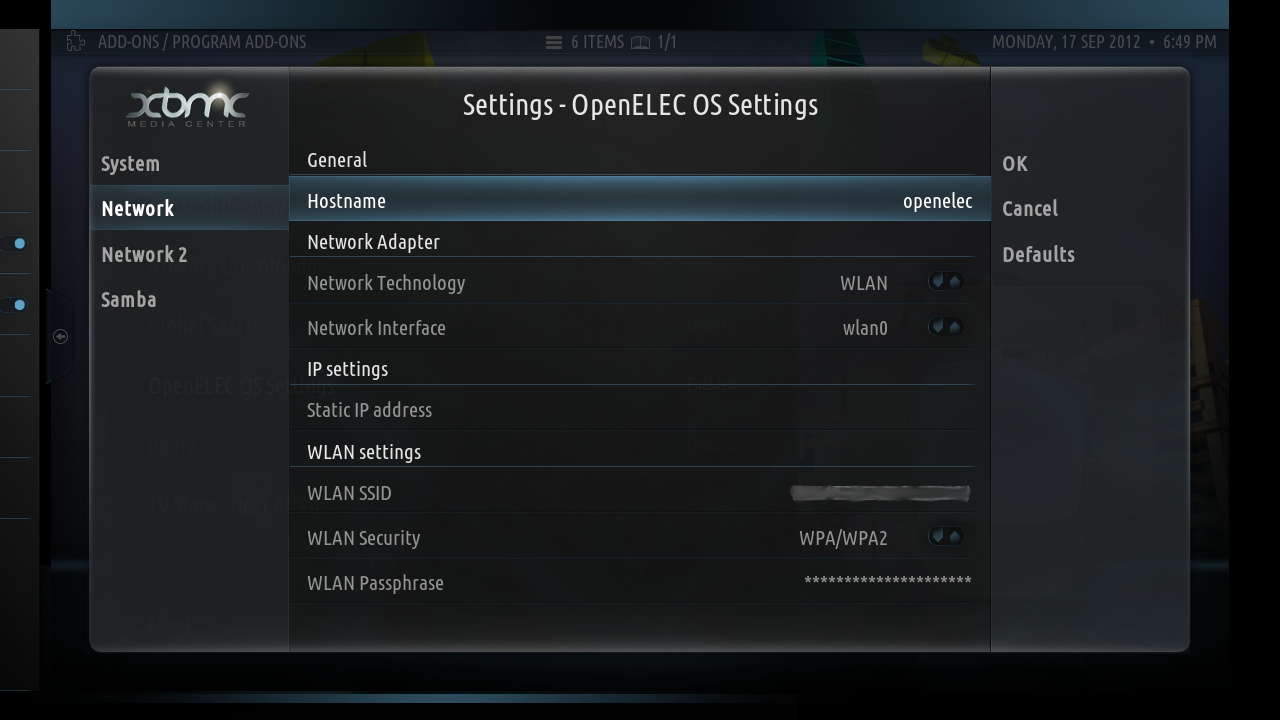
Configure your Network:
Wired Connection
If you are using your local wired connection (always recommended, more powerful and stable than any Wireless connection).
OpenELEC uses DHCP by default, so if you have a DHCP sever enabled in your Network (any ISP Box usually have one), you don't have nothing to do.
Note: If you don't know it already, DHCP will automatically set IP configuration of your devices connected to your Network
Therefore, you can if you prefer set a fix IP Address, go to OpenELEC OS settings
Wireless Connection
You may also want to use a wireless connection, the USB Wireless device provided works out of the Box, so just go to OpenELEC OS Settings.
You have to know:
- Your Wireless SSID (eg the name of your Wireless Network)
- Your Wireless Encryption mode, WEB or WPA
- Your encryption Key
Also, note that the name of your Wireless interface should be "wlan0".
Example of configuration:
Check your Network connection status
Go to Parameters, scroll back and select sub-menu "System Information":


Configure Video Playback options:
Configuration advises:
- In System->Settings->System->Video Settings:
- Vertical Sync: Always on
- In System ->Video->Playback:
- XVBA: On
- Adjust Refreshrate to match video: On
- Sync Playback to Display: On
- Sync Method: Video Clock (Drop/Dupe)
Configure your skin
By default XBMC is provided with the Skin "Confluence" with is good enough but you may really appreciate to take a look at others skins.
I would recommend 2 skins in particular:
- AEON NOX
- NEON
Let's give a try to Aeon Nox :-)
Go to Parameters, Skins:


Step 4: Configure your Media Library
First of all, OpenELEC will automatically be able to access to any device you will connect (external Hard Drive, USB keys...) and also able to access to any shared in your Network.
So do not worry about statically mounting your volumes in OpenELEC, this is not required.
Take a look on my older post, Step 9:
http://youresuchageek.blogspot.fr/2012/06/xbmc-install-and-config-howto-for-linux.html
Everything will be explained on how you can set up your Media Library.
Step 5: Configure the sound
The Zotac AD11 is provided with a combo Jack / Optical connection (in front of the device) usable with an adapter, in addition with the HDMI connection, you have 3 possibilities:
- Analogical using jack
- Numerical using HDMI
- Numerical using SPDIF
For information, here is the "aplay" output on Zotac AD11, you can see here the 3 interfaces:
**** List of PLAYBACK Hardware Devices ****
card 0: Generic [HD-Audio Generic], device 3: HDMI 0 [HDMI 0]
  Subdevices: 1/1
  Subdevice #0: subdevice #0
card 1: SB [HDA ATI SB], device 0: ALC892 Analog [ALC892 Analog]
  Subdevices: 1/1
  Subdevice #0: subdevice #0
card 1: SB [HDA ATI SB], device 1: ALC892 Digital [ALC892 Digital]
  Subdevices: 1/1
  Subdevice #0: subdevice #0
I had some issues with the classic way of configuring sound in OpenELEC (using asound.conf) but this may depends on your configuration and hardware capacity. (capable DTS receiver and so on)
I would recommend using the following method which works perfectly.
Note: If you don't have sound in menu, set also the asound.conf file (see Memorandum at the end this post), the system will use default pcm value for system sounds.
FOR HMDI:
Sound output through HDMI, your TV is connected to your sound system through optical
Adapt to your hardware capacity: 2.0, 5.1 speakers, AC3/DTS capable...
Audio output = Optical or HDMI (try both)
Speaker configuration = 5.1
Audio output device = Custom
Custom audio device = plughw:0,3
Passthrough output device = plughw:0,3
Activate or Deactivate AC3, DDS...depending on your hardware
FOR SPDIF:
Sound output from SPDIF, your sound system is connected directly to your htpc using optical connection
Adapt to your hardware capacity: 2.0, 5.1 speakers, AC3/DTS capable...
Audio output = Optical
Speaker configuration = 5.1
Audio output device = Custom
Custom audio device = plughw:1,1
Passthrough output device = plughw:1,1
Activate or Deactivate AC3, DDS...depending on your hardware
Step 6: Zotac Remote control
Zotac AD11 is delivered with a small MCE remote control, and both an internal IR Receiver and external USB IR Receiver.
Fortunately, this remote works perfectly fine out of the Box in OpenELEC.
I would recommend you not to use the external USB IR Receiver because its quality (in my opinion) is very cheap and does not work as good as the Internal IR.
Therefore, if you want to use it anyway, you have to deactivate the Internal IR Receiver to avoid repeating keys in OpenELEC. (Go in UEFI)
Step 7: Optional - Opera Addon - Integrated Web Browser
If you want to get a Web Browser inside your OpenELEC installation, take a look at:
http://dl.dropbox.com/u/8224157/OpenELEC-Ultra/opera/final/index.html
Thanks to his great work, you'll get a full operational Opera Web Browser ^^
Conclusion:
If you are looking for an XBMC Media Center Fusion solution working out the box within a few minutes, then OpenELEC is definitively the solution for you.
This is a very great work from OpenELEC guys!
Memorandum:
- Traditional to configure your sound output using file "asound.conf":
Navigate with your computer inside your network. (Under Linux and Windows, navigate to Network)
You should see a new host called "OPENELEC", go inside (no authentication required) and go to the share called "Configfiles"
You should see a new host called "OPENELEC", go inside (no authentication required) and go to the share called "Configfiles"

Create a blank file called "asound.conf" and put the following content, depending on your choice:
asound.conf:
pcm.dmixer {
   type dmix
   ipc_key 1024
   ipc_key_add_uid false
   ipc_perm 0660
   slave {
      pcm "hw:0,3"               #HDMI, defaults to 48000 kHz
      channels 2
      period_size 1024
      buffer_size 4096
   }
}

pcm.!default {
   type plug
   slave.pcm "dmixer"
}
Configuration in XBMC: Parameters, System, Sound configuration
Audio output = HDMI
Speaker configuration = 5.1
Audio output device = Custom
Custom audio device = plug:dmixer
Passthrough output device = hdmi (alsa)
Note: You may need to adapt this to your configuration, if you don't have a 5.1 sound system choose 2.0, if don't have DTS decoder uncheck it, and so...
For Digital sound through SPDIF:
asound.conf:
pcm.dmixer {
    type dmix
    ipc_key 1024
    slave {
        pcm "hw:1,1"
        period_time 0
        period_size 1024
        buffer_size 8192
        rate 48000
     }
     bindings {
        0 0
        1 1
     }
}

pcm.!default {
   type plug
   slave.pcm "dmixer"
}
Configuration in XBMC: Parameters, System, Sound configuration
Audio output = Optical
Speaker configuration = 5.1
Audio output device = Custom
Custom audio device = plug:dmixer
Passthrough output device = plug:dmixer
Note: You may need to adapt this to your configuration, if you don't have a 5.1 sound system choose 2.0, if don't have DTS decoder uncheck it, and so...
FAQ:
Feel Free to comment!
Great guide!
ReplyDeleteThe bios update is a must.
Also i had problems with playback of some tv shows, it had sort of artifacts during its play.
I downgraded from 1.95.7 to 1.95.6 and it was gone so i guess it was a driver issue.
Thanks :-)
DeleteI haven't noticed any playback issue for now, was this HD video ? (mkv ? artefacts songs like H264 5.1 Level video bug)
It was a mkv 720p h264 tv show.
DeleteIt was watchable but it made sort of huge blocks in the background as if the mkv was not properly encoded. turning of the xvba made it look normal but then my movies would be worse because of the software mode.
Ok thanks, i'll give a try will mot of my library to see i find an mkv causing troubles in last OpenELEC build...
DeleteYouresuchageek: Howto Openelec : Get The Perfect Fusion Xbmc Media Center With Zotac Nano Xs Ad11 >>>>> Download Now
Delete>>>>> Download Full
Youresuchageek: Howto Openelec : Get The Perfect Fusion Xbmc Media Center With Zotac Nano Xs Ad11 >>>>> Download LINK
>>>>> Download Now
Youresuchageek: Howto Openelec : Get The Perfect Fusion Xbmc Media Center With Zotac Nano Xs Ad11 >>>>> Download Full
>>>>> Download LINK jk
Some additions:
ReplyDeleteFor passthrough hw:0,3 should be enough, the plughw device does some software conversions that are not needed here.
The UMA size of 512MB should also be enough. We made some Level51 Tests and 512MB worked out fine.
@Anonymous: Your 720p h264 show is probably Level 3.1@High with CABAC NO. This is a bug in Catalyst 12.8 that openelec currently shipps. Will be fixed in oe2.0 RC1.
@Peter
DeleteHi, i will correct my guide :-)
Thanks for helping me to improve it!
@Guilhem:
ReplyDeleteYou were intentionally right. We just made some tests. The disadvantage of the Level51 Hack is, that there must be reserved a lot of Video Memory internally. So if you use VDR / TVheadend and switch channels while in window mode - you will see a flickering after some switches.
So - if you see those with 512MB, increase to 1024MB. We are currently investigating, if we can "reset decoder" after 5 times switches channels :-)
@Peter:
DeleteHi, thanks for the update, so better to advise setting it at 1GB finally ^^
I recently purchased the AD12 and this article was a huge help.
ReplyDeleteThe only issue left to track down is why the internal IR receiver isn't working. The USB receiver works, but - like you recommended - I'd prefer to use the internal. I have the CIR enabled in the BIOS; is there anything else I need to do? The only drivers that came with the box are for Windows.
Hi, i'm glad it helped you :-)
DeleteI haven't yet tested myself OpenELEC with AD12, i searched for the OpenELEC forum and found this:
http://openelec.tv/forum/103-infared-remotes/47997-no-signal-at-all-with-zbox-ad12-internal-ite8713-ir-receiver#47998
In deed, it seems the internal IR does not work with AD12 under OE (which is quite strange since the hardware is the same), you should try to "wake up" this post to get OE developers help. (perhaps some device or manufacturer id has changed between AD** and AD12)
About the external IR, it may works perfectly for you, i think Zotac produced some bad series, every AD** i've tested had issue with the external IR but i know some people never had issue.
According to other AD12 users, a bios update and the 11/26 nightly of OpenElec fixes the internal receiver problem. Trouble is, I'm not quite sure how to update the bios. How did you update the bios, using afu303.exe, afuwin.exe, or the update.bat? I can create a bootable dos usb stick, but I'm not quite sure where to go from there. I don't want to brick my new machine. Thanks for all the help.
DeleteHi, first you need to create your USB dos boot media, then copy the provided rom file with other files.
DeleteUnder dos, you will use the afu303.exe (which is a dos exe) to first backup your existing rom and then upgrade. Others exe are to be run under Windows for live bios upgrade.
Look a the pdf file provided by Zotac, page 8 for upgrade instructions under dos, and use same commands for backup / upgrade
As long as you don't loose power during the flash upgrade there is no risks.
@+
great guide. it helped a lot since i got problems with my xbmcbuntu installation after some months and i needed to reinetall for my kids to watch their favorits. Hope this OpenELEC installation keeps running...
ReplyDeletety
wolfgang
Hi
ReplyDeleteGreat guide. Thanks!
Can you say a few words about the AD11's internal temperatures, esp. after extended HD material viewing?
Thanks.
Hi, Thanks :-)
DeleteI'd like to, but this one was not for me as i don't have it anymore ^^
As far as i remember, this devise was not too noisy (ventilator sound easily covered), HD material viewing won't really affect CPU (as done by GPU's hardware acceleration) and so this is not expected to really increase CPU temp...
Thanks so much for this guide...absoloute GOLD. I followed everything here to get OpenELEC installed on a newly purchased AD12 this week. I ran into a couple of problems which I've solved and one which I've not yet which I'll just list here in case anyone else has the same problems.
ReplyDeleteInstalling:
Had an issue with the USB boot of the image. I used the procedure from windows to create the thumbdrive and the system would boot but right away go to "system Halted". This was with a Kingston 16GB drive. I then tried a Sandisk 64GB (wouldn't even recognize it as a boot device!) and finally things worked fine with a Kingston 2GB.
Second issue was things hung at removing /tmp/Part1 at 87%. I just rebooted at this point and everything was actually setup correct. No obvious after effects from this.
Using:
I installed the Aeon Nox skin which caused xbmc to hang randomly every few seconds. And when I say hang, it locked up the whole box..had to hard reset. Going back to Confluence, I've seen no issues since this. Seems to be a known issue as a few others had the same problem.
I have an external DVD player (writer) which I'm using to play regular DVDs on xbmc. Took me ages to get it working and finally after finding a solution on google, got it going. Basically, when I plugged it in everything worked in so much as it recognized the device and inserting a DVD mounted it and allowed you to browse the files. But it wouldn't play as a DVD. The solution seems to be to make sure there is a disc in the drive when the system boots. After that, you always get the "Play Disc" root menu appearing in XBMC.
The remote is "hmmmmmm" with the Zotac. It's "OK" but the IR field is very narrow and the buttons very very small. Going to look and see if I can get a better remote. Picked up a very nice small keyboard from IO gear which works great for when there's a lot of text to enter though.
Unsolved
My final problem which is driving me crazy is around sound. Using HDMI as follows:
AD12 --HDMI--> Receiver --HDMI--> TV
The receiver is an HDMI switching receiver. Anyway, everything works just fine until you switch inputs on the receiver and then switch back. After this, video is fine but sound is gone. Only way I've found to restore it is to power cycle the AD12. Any ideas on this? This is the last problem to having a perfect system.
Hi Dave,
DeleteThanks for you great comment, i'll take a look if there anything i can improve in my guide.
About Aeon Nox skin i noticed it too, freeze most often when running media library updates as for an example, i guess we shoud look for a newer version of this skin, out of XBMC repository...
For your sound problem, i've seen that before and found some workarounds, take a look this post:
http://openelec.tv/forum/68-audio/34424-sound-vanishes-switching-between-xbmc-and-tv?limit=20&start=40
You may post or search for more similar cases in OE forum
Cheers
Dave, take a look here:
Deletehttp://forum.xbmc.org/forumdisplay.php?fid=142
If you're running stable OE version, choose Eden, with last beta OpenElec choose Frodo
One thing about your remote control, you can off course change for another one like any RC6, but keep in mind that you won't be able to start up the system with it, as far as i know...
Hi,
DeleteOpenELEC Frodo 2.99.2 (3.0 RC2) is very stable with Aeon Nox, works great!
Regards,
Yeah, I finally solved/worked around the sound problem with the script on this thread:
Deletehttp://openelec.tv/forum/68-audio/34424-sound-vanishes-switching-between-xbmc-and-tv?limit=20&start=40
works like a charm and my box is now pretty darn solid (only a problem with an add-on has caused a reboot). I leave it on 24*7 and the rest of the fam have taken to using it instead of our WDTV Live so it's a keeper. Next project is live TV with an antenna and an HD Homerun box but that may be for warmer weather to get the antenna mounted!
Hi,
DeleteI have installed OE 2.99.4 (v3.0 RC4)on a ZOTAC AD03 (AMD E-350). After BIOS-Update and changing the UMA-Settings to 512, mkv-files running smooth and without any artifact (which was an issue in earlier versions of OPENELEC). So far so good.
But: there is still an issue with the AEON NOX skin playing music and using PROJECTM as visualization. Every time the visualization is starting (manually or after time) the machine is making a reboot. :-(
This is not a problem with AN as skin and GOOM as visualization or CONFLUENCE as skin and PROJECTM as visualization. I had this issue already in earlier versions of OE, hoped for a solution with this new release of OE and AN.
Any ideas?
Greetings from germany,
Helmut.
Hi Helmut,
DeleteWell i never tested it but i will, have you looked for any useful information in XBMC or system logs ? (perhaps temporarily increasing XBMC verbose mode could be useful to get more logs info)
Probably a core dump is being generated, it could be analysed by XBMC (or related) dev by opening a tread in official XBMC forum
Cheers!
I want to be able to use stand-alone windows programs, is that possible.
ReplyDeleteSome more details ? Under Linux you can use Wine to do so, but i don't think it's possible with OpenELEC...
DeleteIs there anyway (currently) to run a VPN in OpenElec? The scenario is this...
ReplyDeleteI am about to pick up a raspberry PI and turn it into my HTPC, and will be running OpenELEC/XMBC as my OS. As I live outside of the US, I want to get access to US Internet content such as Hulu. Ideally I'd want my HTPC to constantly be running my VPN subscription, so I can choose to stream hulu via my HTPC w/ a US IP address while my other PC's at home continue to use a local IP address to avoid unnecessary encapsulation, etc.
I have considered adding VPN via a router, but I do not want a seperate router just for my HTPC, and I do not want my other PC's to be attached to the VPN.
Hi, It is not something natively supported with OpenELEC, the only chance (beside recompiling yourself OpenELEC and probably some work ^^) would be to get it working as an addon.
DeleteTake a look here:
https://github.com/OpenELEC/OpenELEC.tv/tree/master/packages/network/openvpn
I haven't tested, seems poor documented and not sure it will work with last OE versions...
In my opinion, your best solution is to install XBMC under a full Linux OS like any Ubuntu derivated distribution (this is the way i do):
http://youresuchageek.blogspot.fr/2012/06/xbmc-install-and-config-howto-for-linux.html
Sorry i haven't seen you were speaking about getting a Raspberry. (as you are in a fusion based article ^^)
DeleteYou can try to get XBMC to work directly under Raspbian (the official Linux Debian derivated OS for Raspberry) by compiling yourself XBMC, but this is not an easy task and you will get hard work to get it as good as works OpenELEC for Raspberry...
One solution could 2 Raspberry Pi, one connected to the VPN and acting as a router for your Raspberry running OpenELEC, it will still be cheaper than the price of a normal HTPC or a dedicated router :-)
my zotac boot only (usb2) if create the usb key
ReplyDeletein fat32
and with create_installstick .bat only (command)
I guess you mean creating the key under Windows ? under Windows indeed fat32 filesytem and bat script
DeleteHow to configure Wake on Wireless? Cannot find anything about this.
ReplyDeleteThanks!
Zotac zbox nano AD12
OpenELEC-Fusion.x86_64-2.99.5
Hello! Thanks for your rich detailed How-To. It was very easy to install and configure Openelec in my new Zotac Nano with your help. My only problem now is that when I'm playing a movie, randomly the video pauses while the audio continues normally, and then after like 2 or 3s the video resumes some frames ahead, syncronized with audio. This happens 6-8 times in a 120min movie. I have an Zotac Nano AD11 with a 64GB SSD where I installed the latest Openelec connected via LAN cable to my router, streaming movies from a NAS 1,5 TB HD, also wired on the router.
ReplyDeleteDo you have any clues about what I'm facing?
Many thanks in advance.
[]'s
-Erick
Hi Erick,
DeleteI'm glad this helped you as much as possible :-)
Never really had this issue as you described it.
My advice, begin step by step, first you need to exclude something related to networking issue, copy one movie (one of the same you have problem with) to any USB device you will directly plug into the Zotac.
Then try to play it using XBMC, if you still have issue then you're problem is not networking related.
I would then advise to:
- check you have last Zotac Bios for your device
- ensure you correctly set UMA frame buffer size to the upper value possible
- Double check each of your XBMC settings and potentially try activating / deactivating / changing some
- Monitor your CPU load (in terminal using top) during movie playing, in case of issue you could have around 100% permanent load which could lead to trouble
Still, remember most of movie like H264 encoded will use hardware decoding using the GPU, so getting an high enough CPU load should imply such issue
Anyway, first you need to exclude any networking related trouble
let me know!
Still, remember most of movie like H264 encoded will use hardware decoding using the GPU, so getting an high enough CPU load should imply such issue
Delete--> Should NOT imply this kind of issue (what i wanted to say :-)
Hi Guilhem,
DeleteThe issue also occured when I played a movie directly from an USB device. :-(
The UMA frame buffer is 1GB and I already tried enabling/disabling every option in Video Execution and System Video Output screens. I turned on debugging and the CPU load was never higher than 30%, even when the problem happened. The fps also didnt got low, stayed about 24fps and memory load was ok. This problem occurs even with my old AVI 480i movies. I don't know if the BIOS is the most updated, I'll check it tonight.
Any other ideas?
Thanks for your help!
Hi,
DeleteWell not that much :-) But i guess you have some trouble related to XBMC options.
the fps value songs quite low for me, it should more closed to 50/60 Fps
Are running the last openelec version ? (off course i guess you ensured to install the fusion base version :-)
So, some:
1) XMBC options: See http://openelec.tv/forum/117-xvba-amd/64056-judder-video-tearing-while-playback-on-amd-e-350#72239
Ensure you've tried:
"Adjust Refreshrate to match Video" (Start / Stop) and also "Sync Playback to Video" with method Video Clock (Drop / Dupe Audio). Vertical Blank Sync: Always Enabled (System -> Settings -> Video Hardware).
Then reboot and re-check
--> Note: You also should try this combination with different resolution / frequency settings
2) Try different resolution / frequency combination
3) Ensure your HDMI cable is good, if you can, don't hesitate to try another one
4) Check your TV options related to your source and some vscan options
If still you this issue, open a thread in openElec forum, perhaps someone will have the good idea
I also heard about a recent option in ATI driver (no tearing), but i'm not sure this option is available from OE, i have to check
Let me know!
Hi Erick,
DeleteHave you had any success to find the root cause of your issue ?
Hi,
ReplyDeleteThanks for the great guide - do you have any experience with Power saving and resuming? I'm not sure mine is very reliable when I try to turn it on from the remote (or I'm not patient enough to wait for it to wake up).
Hi,
DeleteWell not that much... Mine is being used as a server so up 24hours a day, therefore i've tried it by the past on various devices with more or less success ^^
With an SSD, this kind of device boots in a few seconds, i prefer to be sure to have a clean system but that's my opinion.
I will try to see how it works now!
Youresuchageek: Howto Openelec : Get The Perfect Fusion Xbmc Media Center With Zotac Nano Xs Ad11 >>>>> Download Now
ReplyDelete>>>>> Download Full
Youresuchageek: Howto Openelec : Get The Perfect Fusion Xbmc Media Center With Zotac Nano Xs Ad11 >>>>> Download LINK
>>>>> Download Now
Youresuchageek: Howto Openelec : Get The Perfect Fusion Xbmc Media Center With Zotac Nano Xs Ad11 >>>>> Download Full
>>>>> Download LINK
Isparta
ReplyDeleteTunceli
Yozgat
Çorum
Konya
SİF
Bayburt
ReplyDeleteKars
Batman
Urfa
İzmir
467E1
Samsun
ReplyDeleteNevşehir
Van
Bartın
Edirne
SUDO
Bursa
ReplyDeleteKırşehir
Muş
Mersin
Çanakkale
RZ6D1P
İstanbul
ReplyDeleteSivas
Kırıkkale
Zonguldak
Iğdır
C75Q
Antalya
ReplyDeleteTrabzon
Niğde
Maraş
Antep
GQYX
Uşak
ReplyDeleteAnkara
Adıyaman
Hatay
Şırnak
HUİ0T
Aksaray
ReplyDeleteAydın
Kütahya
Rize
Bingöl
RQM4P4
Muğla
ReplyDeleteBitlis
Karaman
RMXJAM
Iğdır
ReplyDeleteAdana
Karabük
Diyarbakır
Antep
4ZXGCU
yozgat
ReplyDeletesivas
bayburt
van
uşak
HAUF
whatsapp görüntülü show
ReplyDeleteücretli.show
PVDT
görüntülü.show
ReplyDeletewhatsapp ücretli show
QRXMQ
ankara parça eşya taşıma
ReplyDeletetakipçi satın al
antalya rent a car
antalya rent a car
ankara parça eşya taşıma
1BKS
adana evden eve nakliyat
ReplyDeletebolu evden eve nakliyat
diyarbakır evden eve nakliyat
sinop evden eve nakliyat
kilis evden eve nakliyat
SPVZB2
B1F10
ReplyDeleteİzmir Şehir İçi Nakliyat
Van Şehir İçi Nakliyat
Yozgat Şehir İçi Nakliyat
Çerkezköy Koltuk Kaplama
Gümüşhane Şehirler Arası Nakliyat
Çerkezköy Çamaşır Makinesi Tamircisi
Ünye Oto Boya
Bitci Güvenilir mi
Çorum Şehir İçi Nakliyat
E7E99
ReplyDeleteIsparta Parça Eşya Taşıma
Nevşehir Parça Eşya Taşıma
Ünye Çatı Ustası
Erzurum Evden Eve Nakliyat
Çerkezköy Oto Boya
Şırnak Şehirler Arası Nakliyat
Tokat Parça Eşya Taşıma
Aksaray Evden Eve Nakliyat
Ünye Organizasyon
9747D
ReplyDeleteDüzce Şehirler Arası Nakliyat
Yalova Şehirler Arası Nakliyat
Bitlis Lojistik
Yozgat Parça Eşya Taşıma
İstanbul Evden Eve Nakliyat
Isparta Şehir İçi Nakliyat
Maraş Evden Eve Nakliyat
Van Şehirler Arası Nakliyat
Hakkari Şehir İçi Nakliyat
D5063
ReplyDeleteManisa Evden Eve Nakliyat
Ankara Parke Ustası
Çerkezköy Kurtarıcı
Bibox Güvenilir mi
Bursa Parça Eşya Taşıma
Vindax Güvenilir mi
Urfa Lojistik
Ankara Şehir İçi Nakliyat
Ünye Oto Boya
74272
ReplyDeletebinance
9FAF9
ReplyDeletesohbet
antep sesli sohbet mobil
en iyi sesli sohbet uygulamaları
ordu chat sohbet
ığdır kadınlarla görüntülü sohbet
sesli sohbet odası
balıkesir telefonda kızlarla sohbet
canlı sohbet ücretsiz
rastgele görüntülü sohbet uygulamaları
C3055
ReplyDeleteurfa rastgele görüntülü sohbet uygulamaları
igdir mobil sohbet siteleri
siirt bedava görüntülü sohbet sitesi
Hakkari Görüntülü Sohbet Kızlarla
diyarbakır parasız görüntülü sohbet
niğde canlı sohbet
Adana Kadınlarla Sohbet
amasya canlı sohbet
Uşak Parasız Sohbet Siteleri
55608
ReplyDeleteardahan canlı sohbet
antalya en iyi görüntülü sohbet uygulamaları
burdur ücretsiz sohbet uygulaması
Ankara Sesli Görüntülü Sohbet
Afyon Ücretsiz Sohbet Uygulamaları
yabancı görüntülü sohbet
Kırıkkale Ücretsiz Sohbet Uygulamaları
bedava sohbet siteleri
uşak chat sohbet
8386E
ReplyDeleteSoundcloud Reposts Hilesi
Paribu Borsası Güvenilir mi
Görüntülü Sohbet Parasız
Sohbet
Bitcoin Üretme Siteleri
Nexa Coin Hangi Borsada
MEME Coin Hangi Borsada
Likee App Takipçi Hilesi
Kripto Para Nasıl Üretilir
BEF37
ReplyDeleteGiresun İftar Saatleri
Çankırı İftar Saatleri
Bolu İftar Saatleri
Muğla İftar Saatleri
Balıkesir İftar Saatleri
Hakkari İftar Saatleri
Bingöl İftar Saatleri
İzmir İftar Saatleri
Edirne İftar Saatleri
73CB5
ReplyDeleteAcıgöl
Ağlı
Malazgirt
Tuzluca
Hozat
Ula
Aydın
Doğanşehir
Çiftlik
408F4
ReplyDeleteSarıçam
Boğazkale
Akçakale
Serinhisar
Maltepe
Pütürge
Meriç
Yomra
İnönü